What is the WhatsApp Cloud API?
The WhatsApp Cloud API is Meta's free, cloud-hosted version of the WhatsApp Business Platform. Instead of running the WhatsApp Business API on your own servers (the old On-Premise model), Meta hosts it for you — so you can send and receive messages at scale without managing infrastructure.
For most businesses in 2026, the WhatsApp Cloud API is the fastest and cheapest way onto the platform. Combined with a conversation layer like Zurvis, you get a shared inbox, AI agents, automation flows and broadcast campaigns on top — without writing API code.
Key features & benefits
Instant scale
Meta handles the hosting — no servers, no DevOps.
Lower cost
1,000 free service conversations per month, then Meta's per-conversation pricing.
Global reach
Reach 2B+ WhatsApp users across 180+ countries from one number.
Verified & secure
Official green tick, end-to-end encryption, GDPR-friendly.
Rich messaging
Templates, media, lists, buttons, calls and interactive flows.
First-day features
New WhatsApp features ship to the Cloud API first.
Sandbox vs Go-live
Before you connect your real business number, Meta lets you test with a free sandbox number. You can only message a small list of verified test recipients, but it's perfect for QA. Once you're ready, switch to Go-live with your own business phone number to message real customers at scale.
Skip the setup pain. Zurvis connects to the WhatsApp Cloud API in minutes — shared inbox, AI agents, broadcast campaigns and analytics included.
1. Create an app on Meta
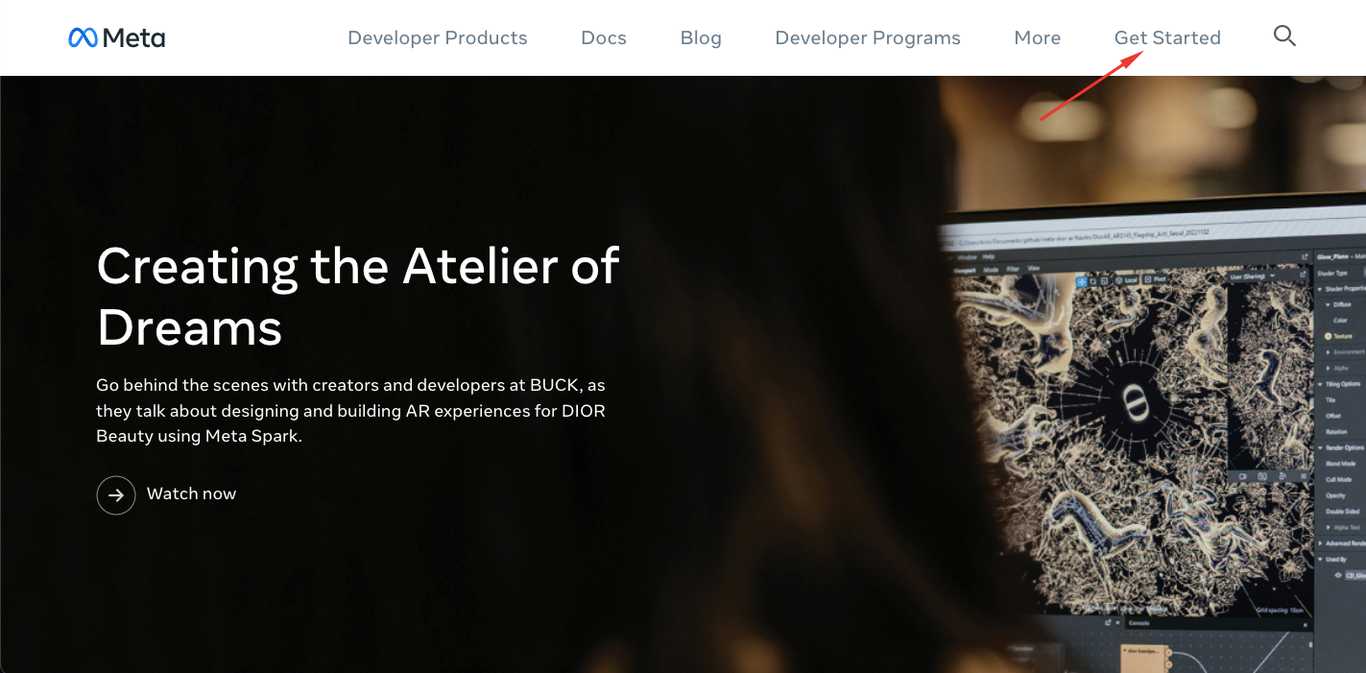
Head to Meta for Developers and sign in. If it's your first time, click Get Started to finish account creation.
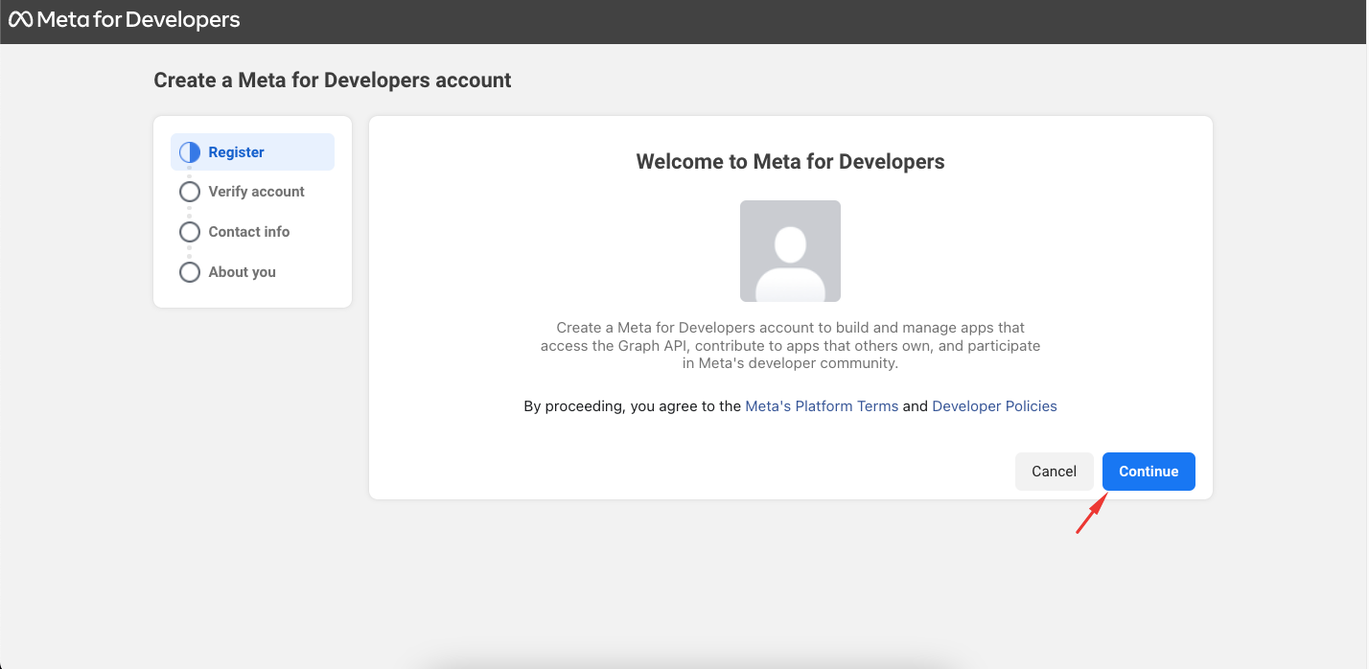
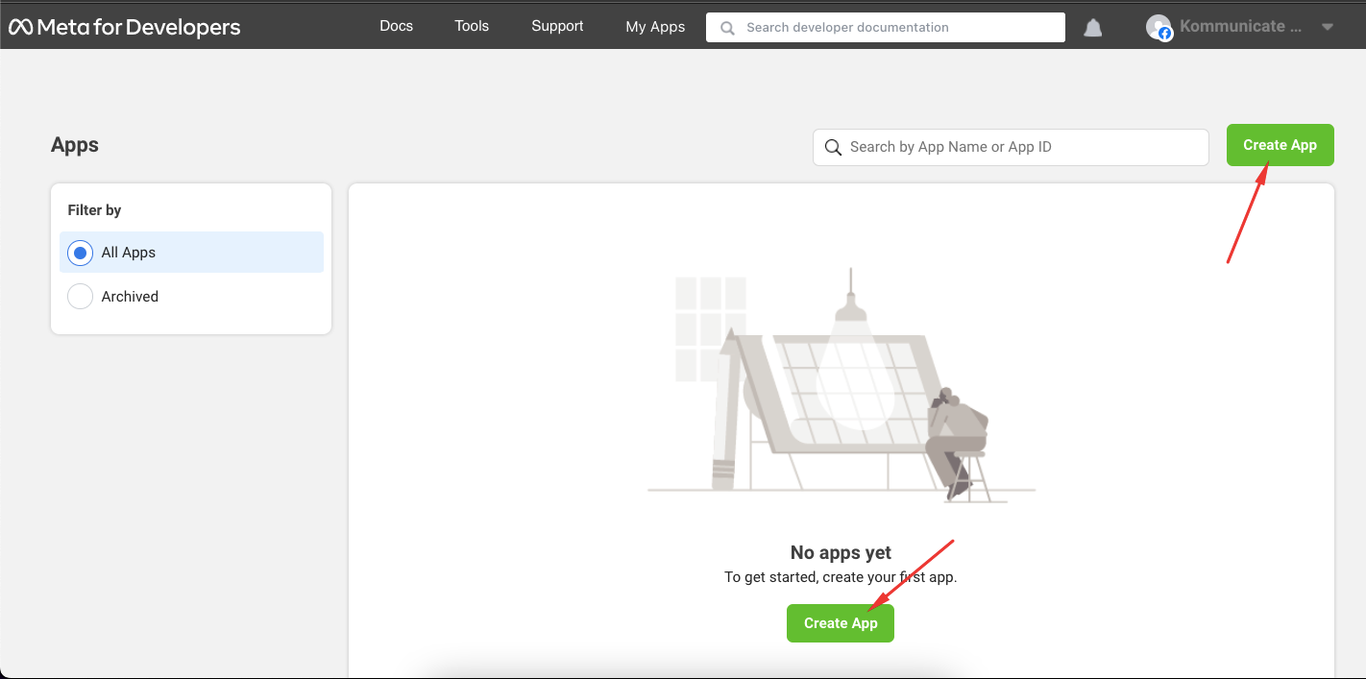
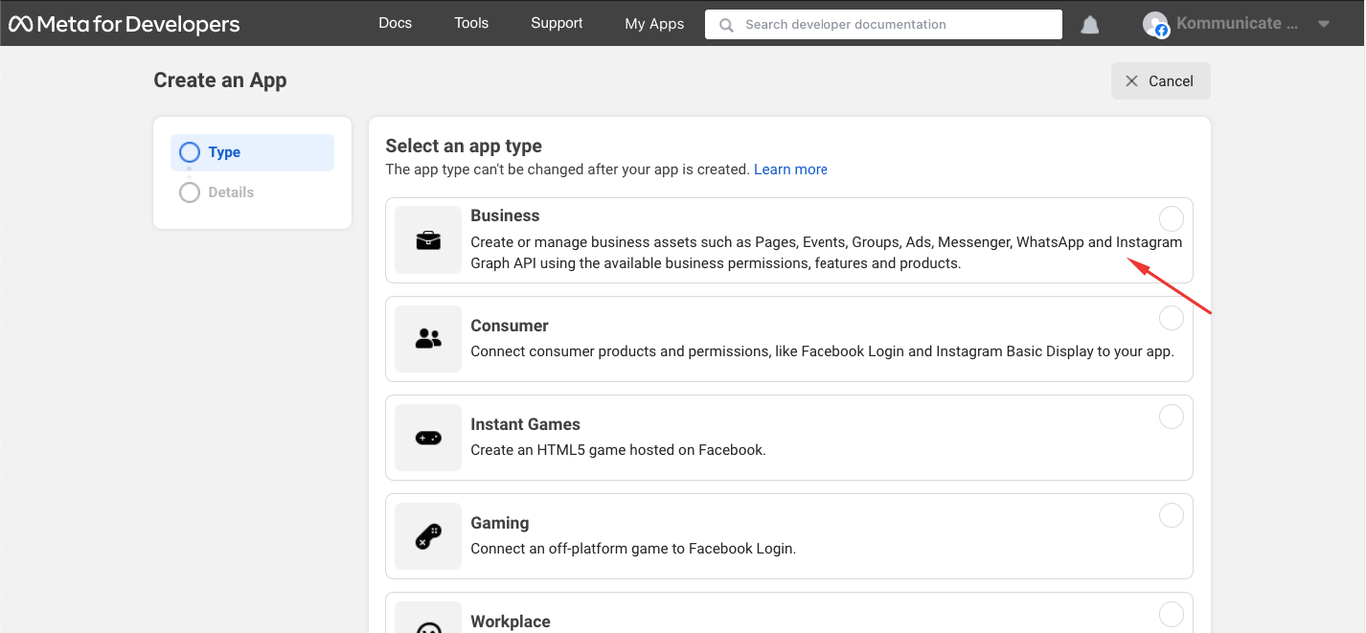
Open My Apps in the top right and click Create App. Choose Business as the app type and continue.
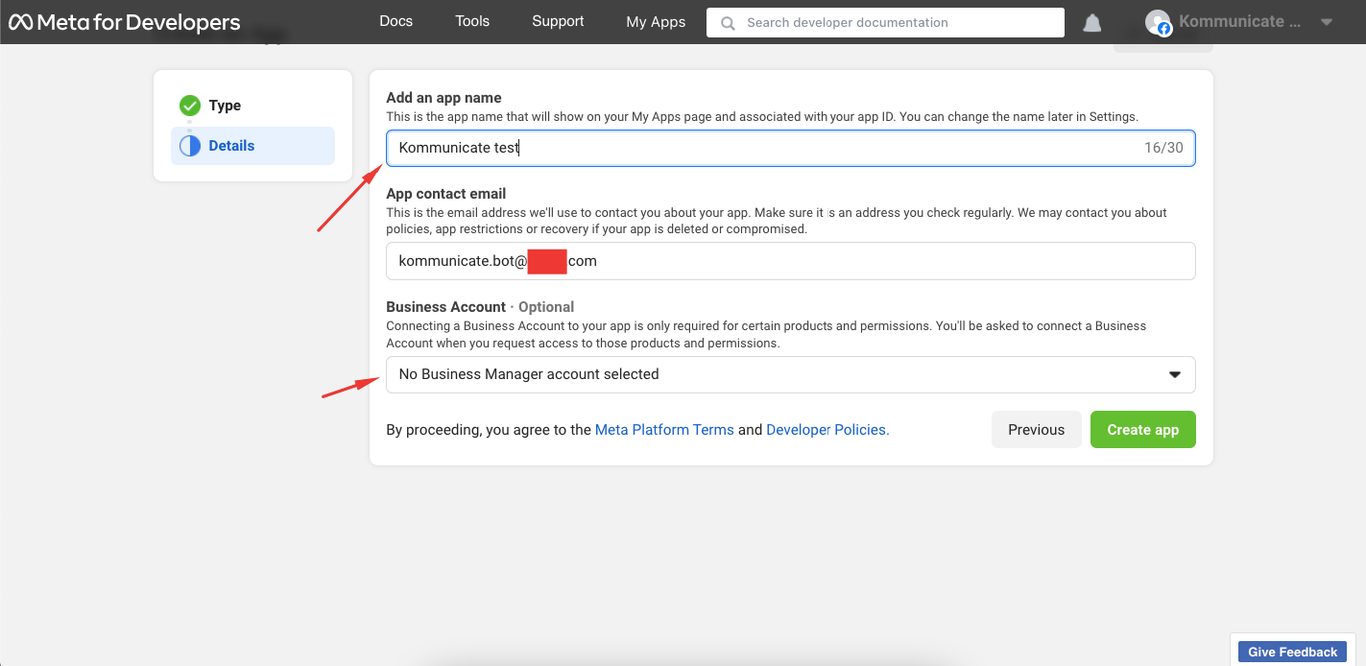
Give the app a name, link a Business account if you have one, and click Create app.
2. Add WhatsApp to your app
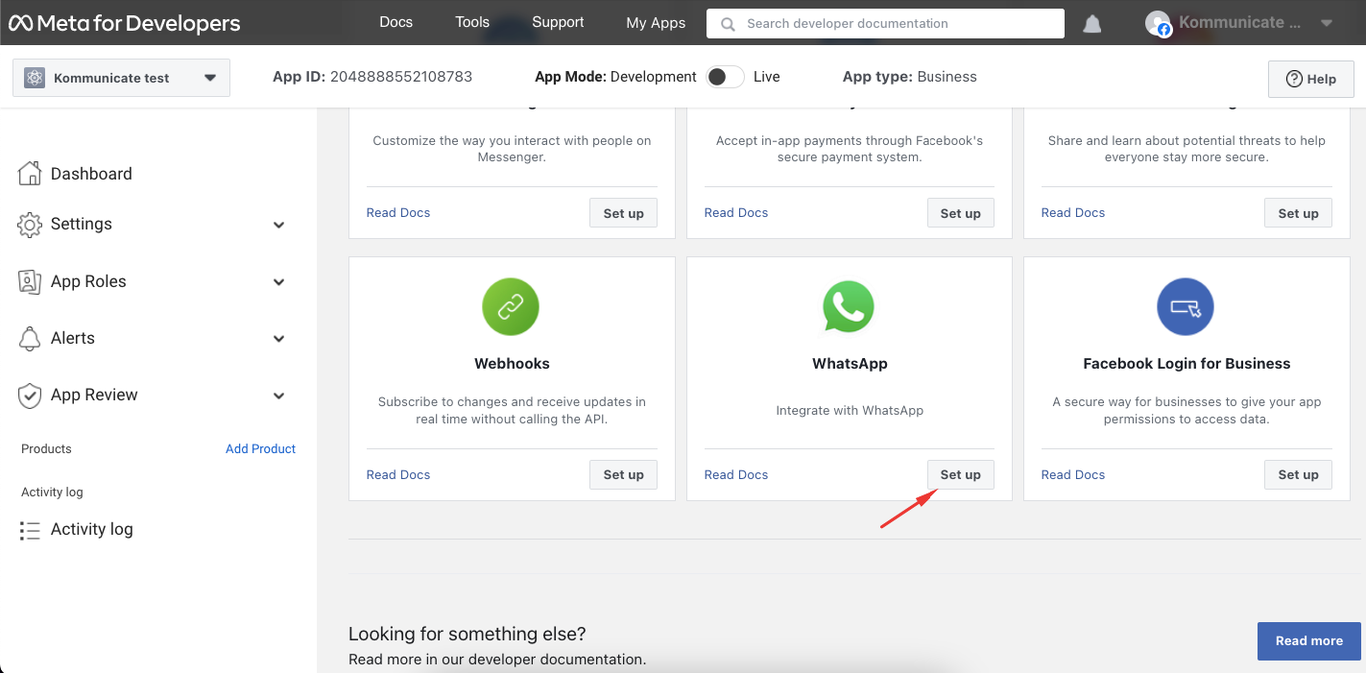
From the Add Products to your app screen, scroll to WhatsApp and click Set up.
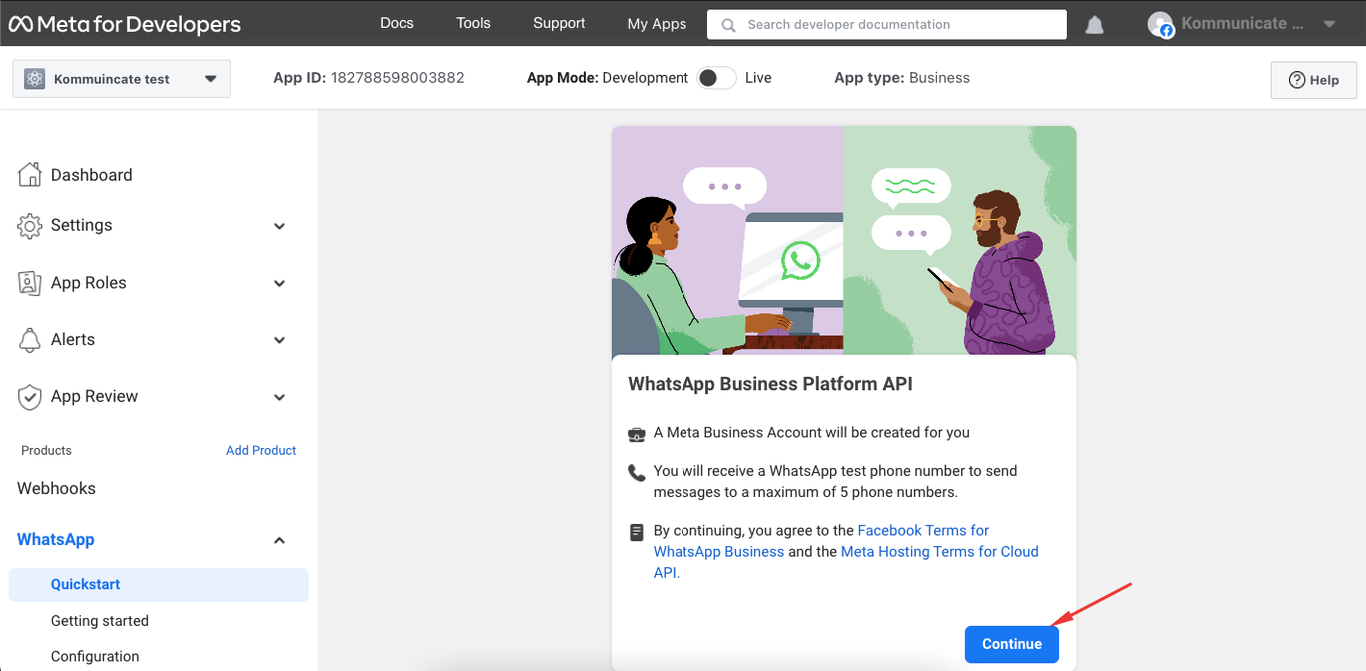
Create or select a Meta Business Account, then click Continue.
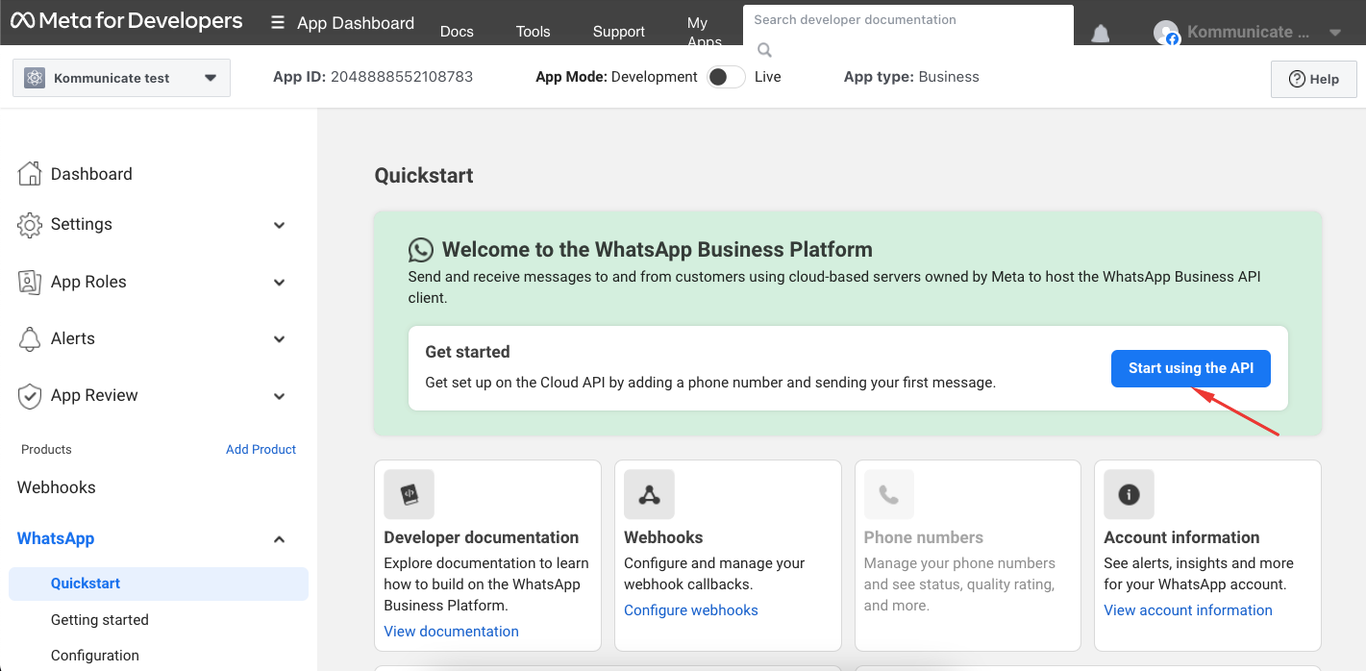
You'll land on the WhatsApp Quickstart page. Click Start using the API.
3. Set up the sandbox in Zurvis
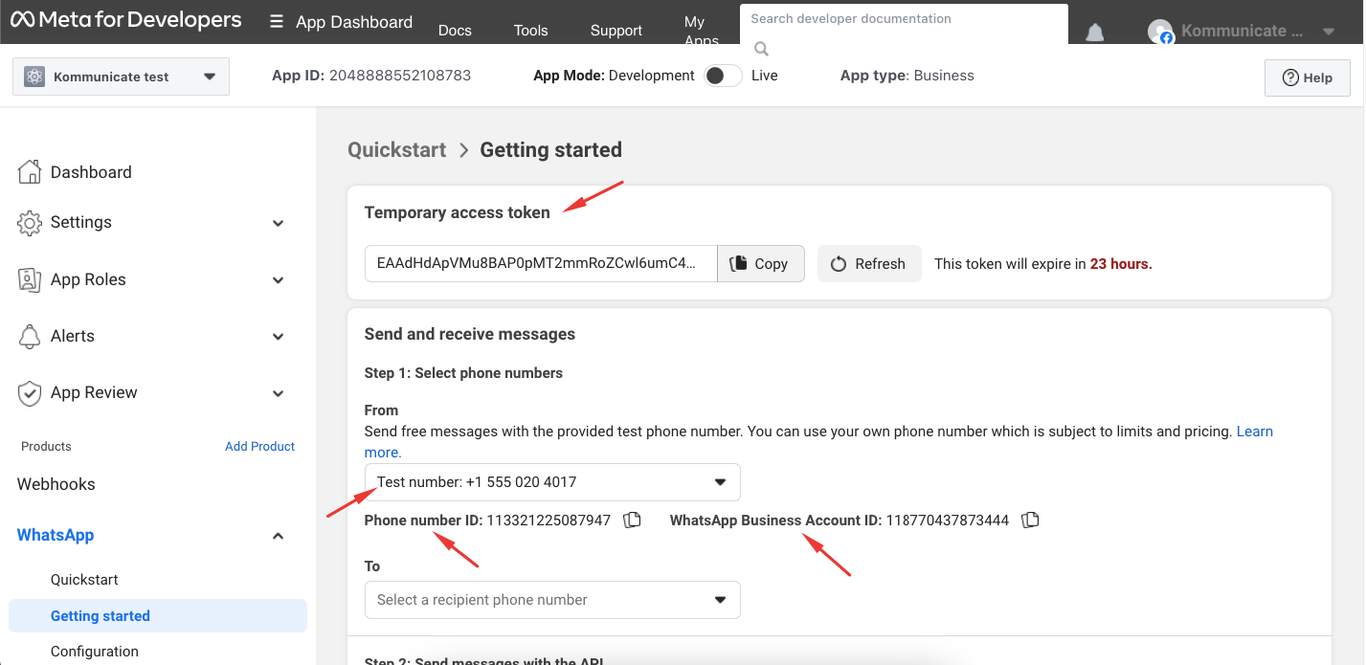
In your Zurvis dashboard, open Channels → WhatsApp Cloud API → Sandbox and paste these four values from Meta's Quickstart screen:
- Temporary access token
- Test number (From)
- Phone number ID
- WhatsApp Business Account ID
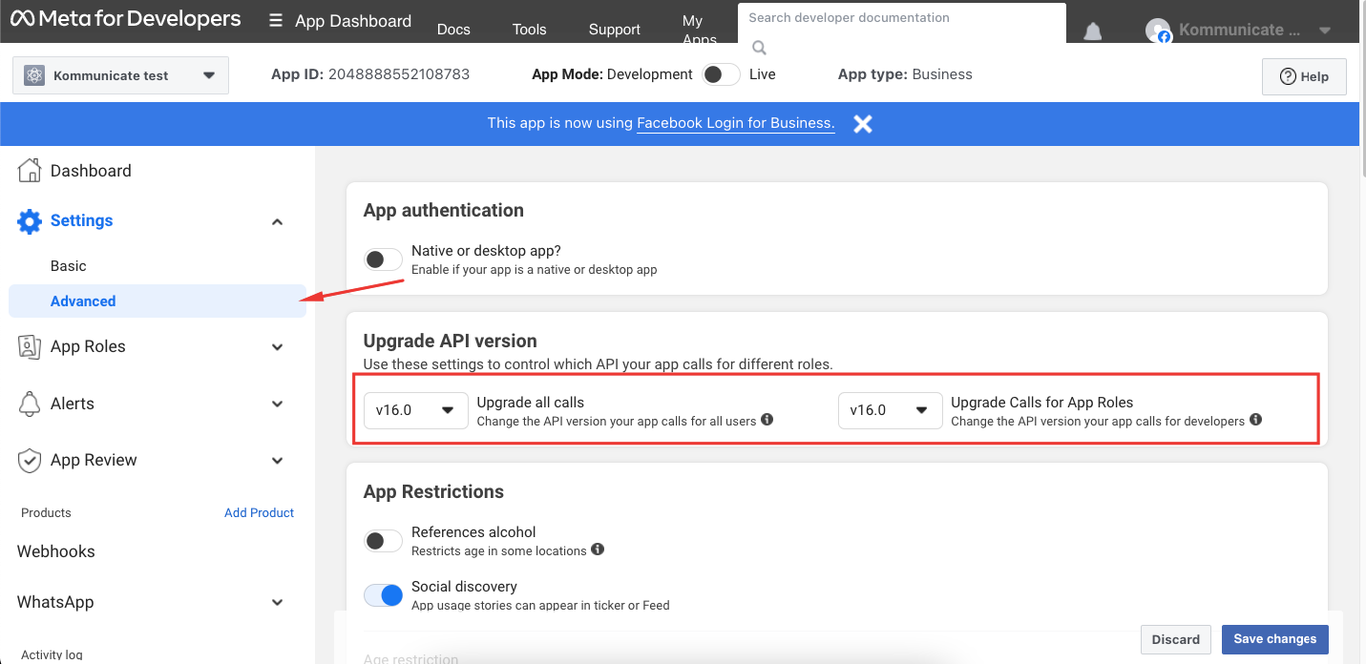
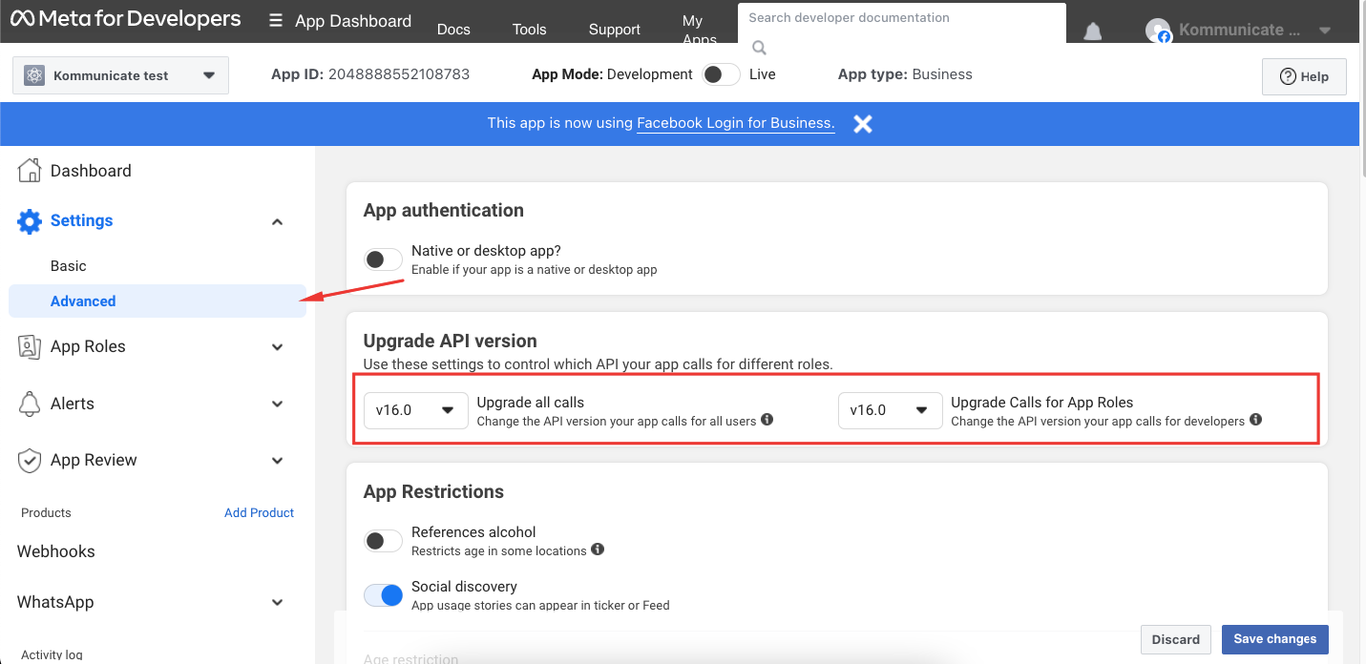
Add the API version too — find it in Meta under Settings → Advanced → Upgrade API version (e.g. v19.0).
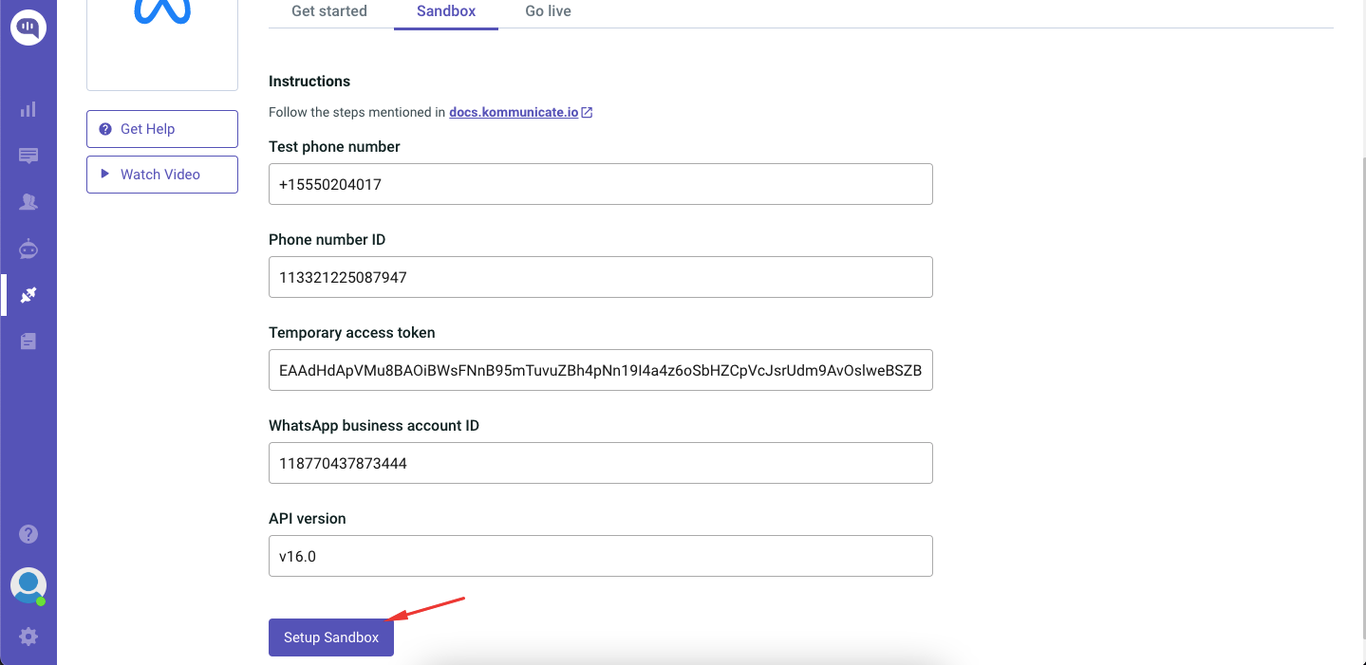
Hit Setup Sandbox in Zurvis. You're connected.
4. Configure the webhook
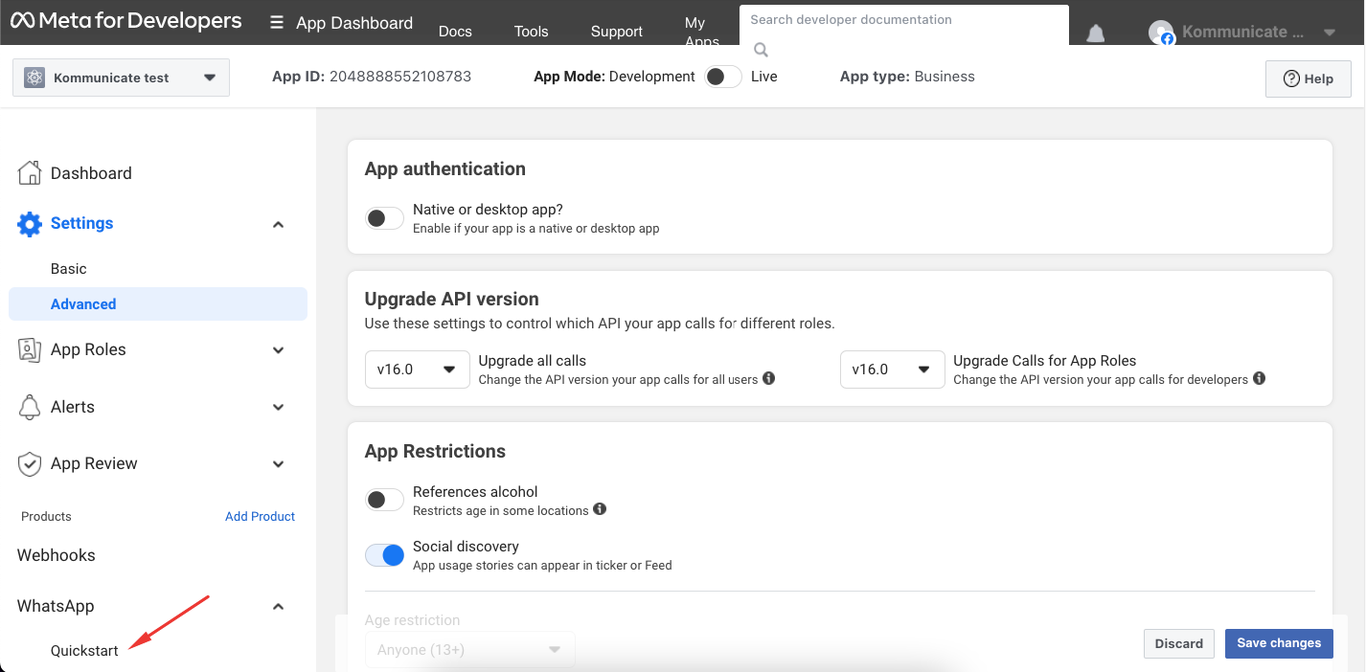
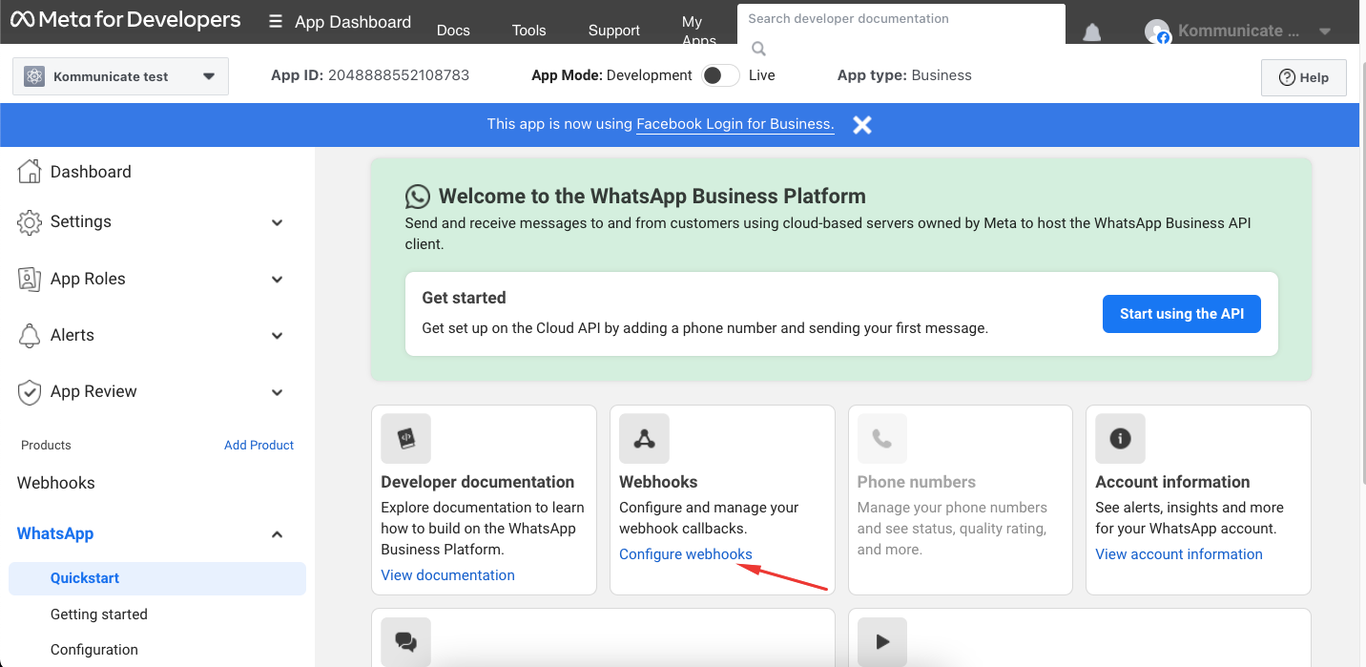
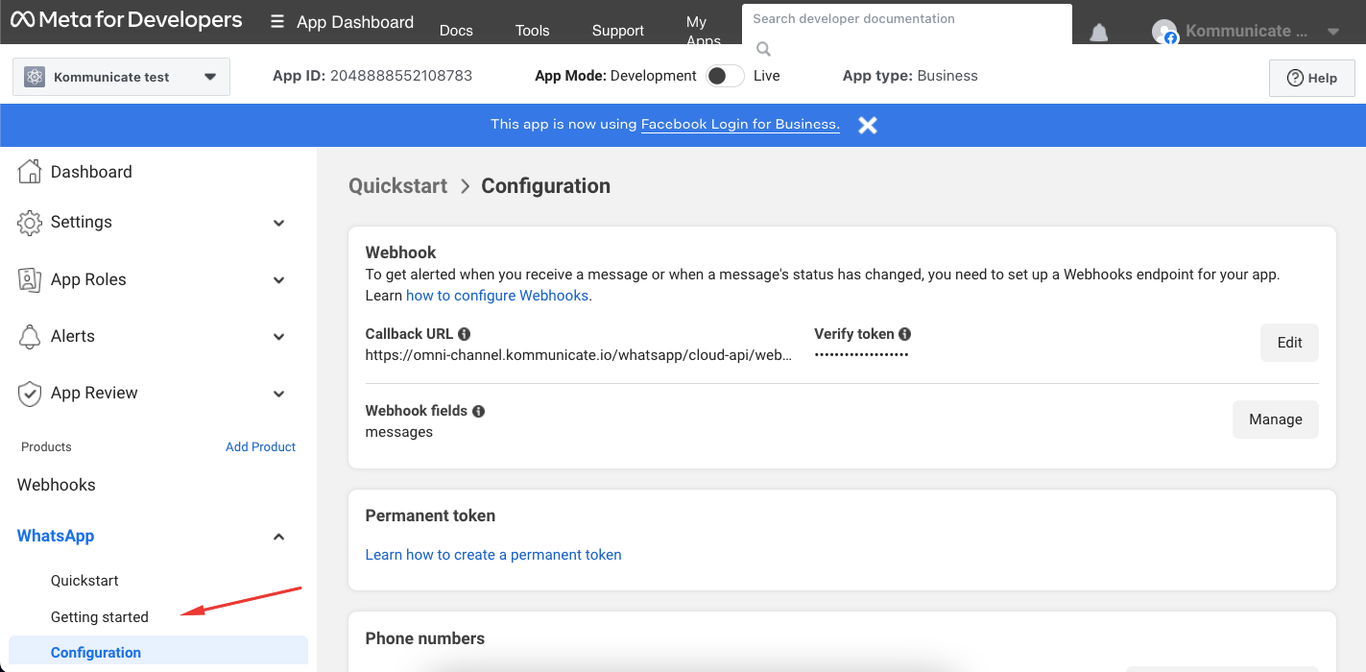
Go back to WhatsApp → Quickstart → Configure webhooks in Meta.
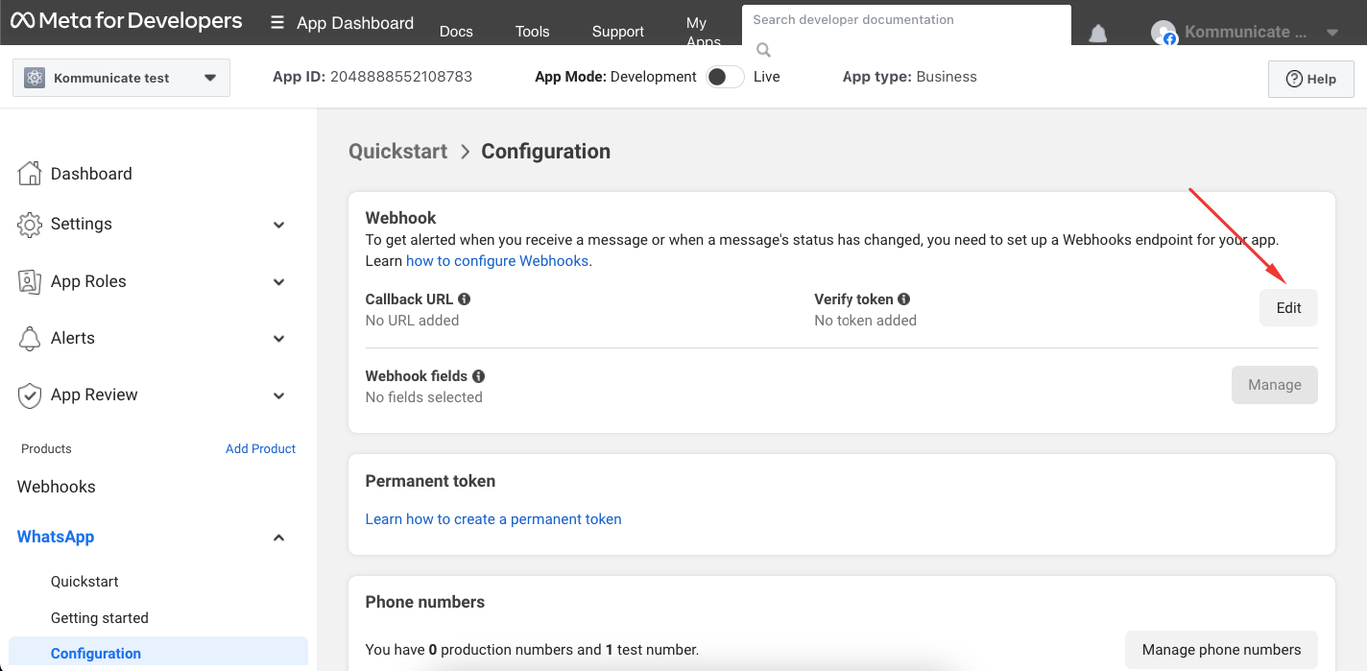
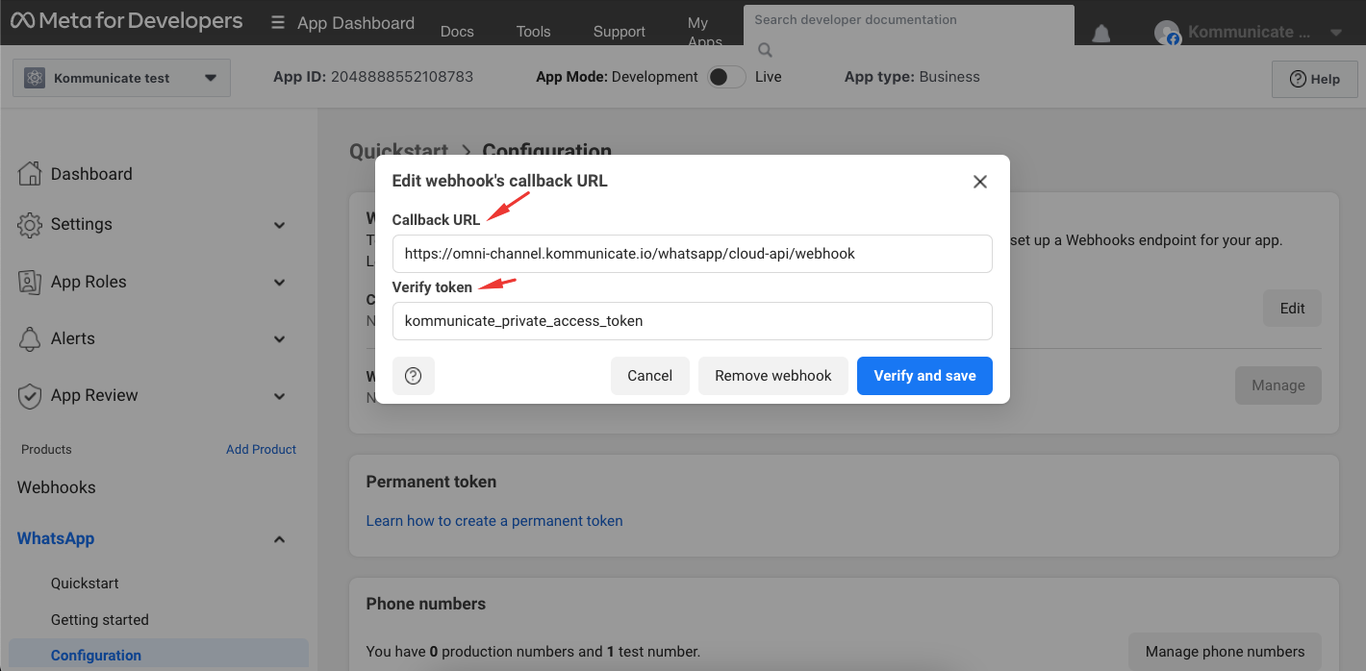
Click Edit and paste Zurvis's Callback URL and Verify Token (both shown in your Zurvis channel settings). Click Verify and Save.
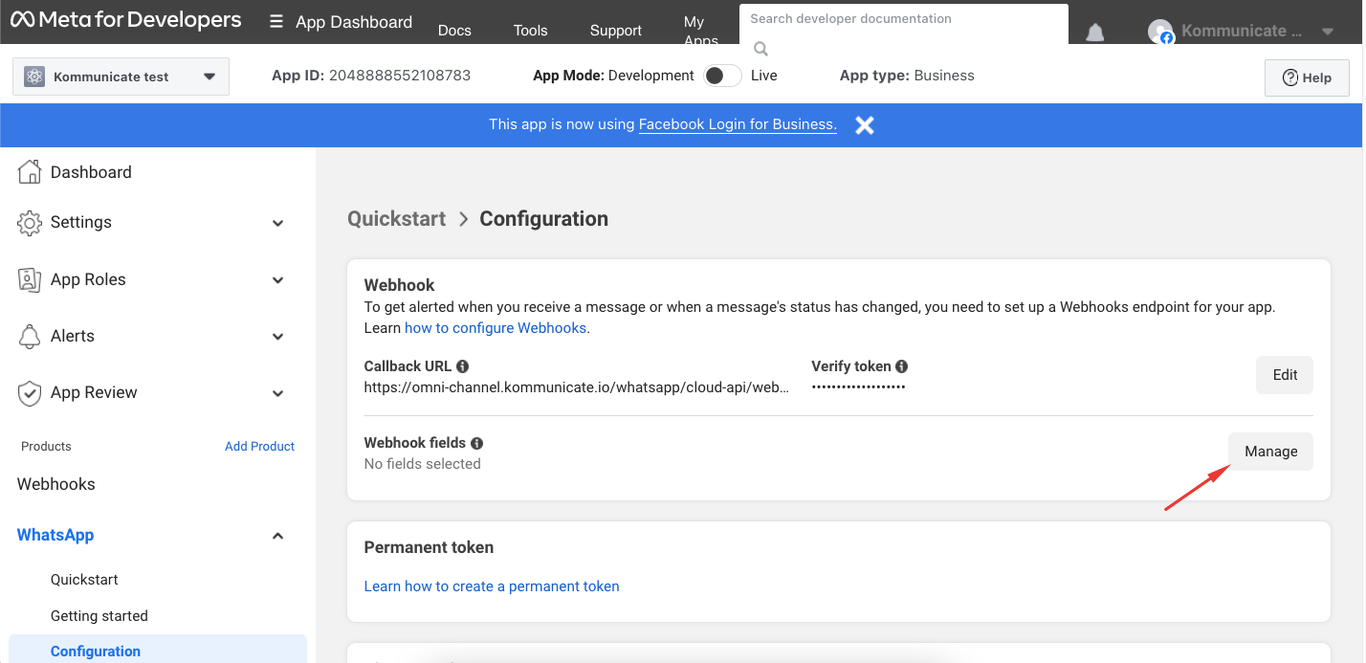
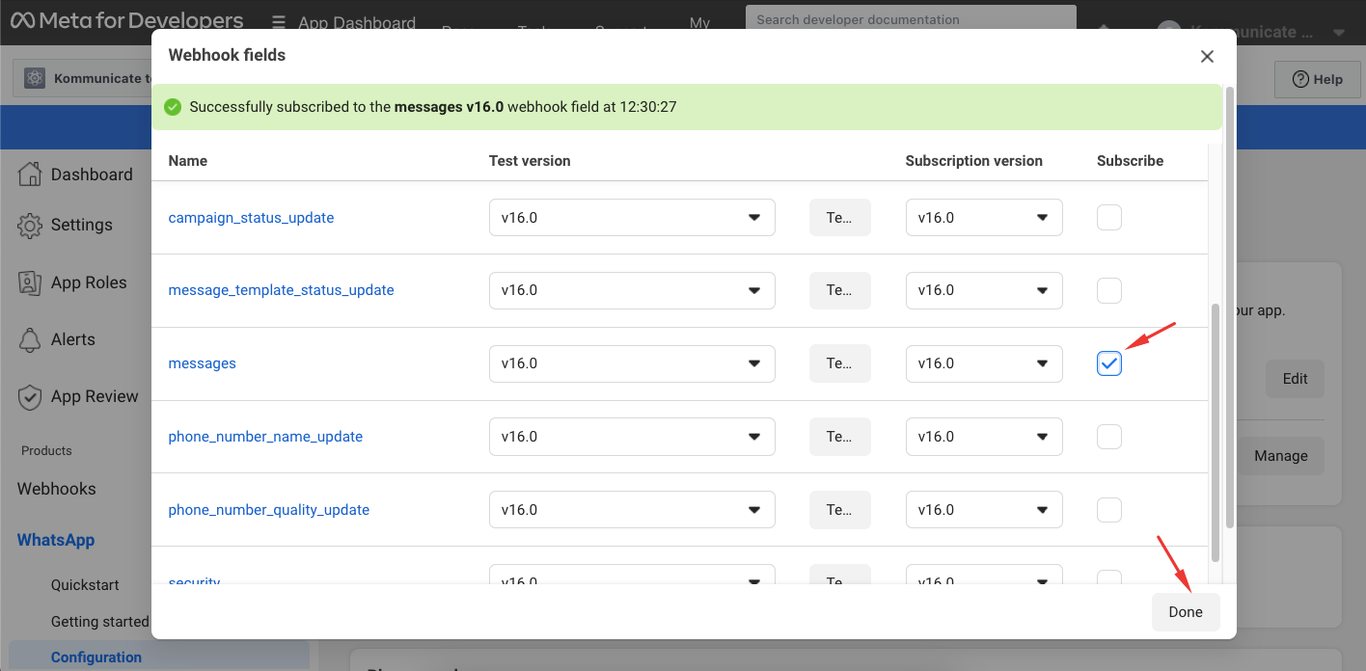
Under Webhook fields, click Manage and subscribe to the messages field.
5. Send a test message
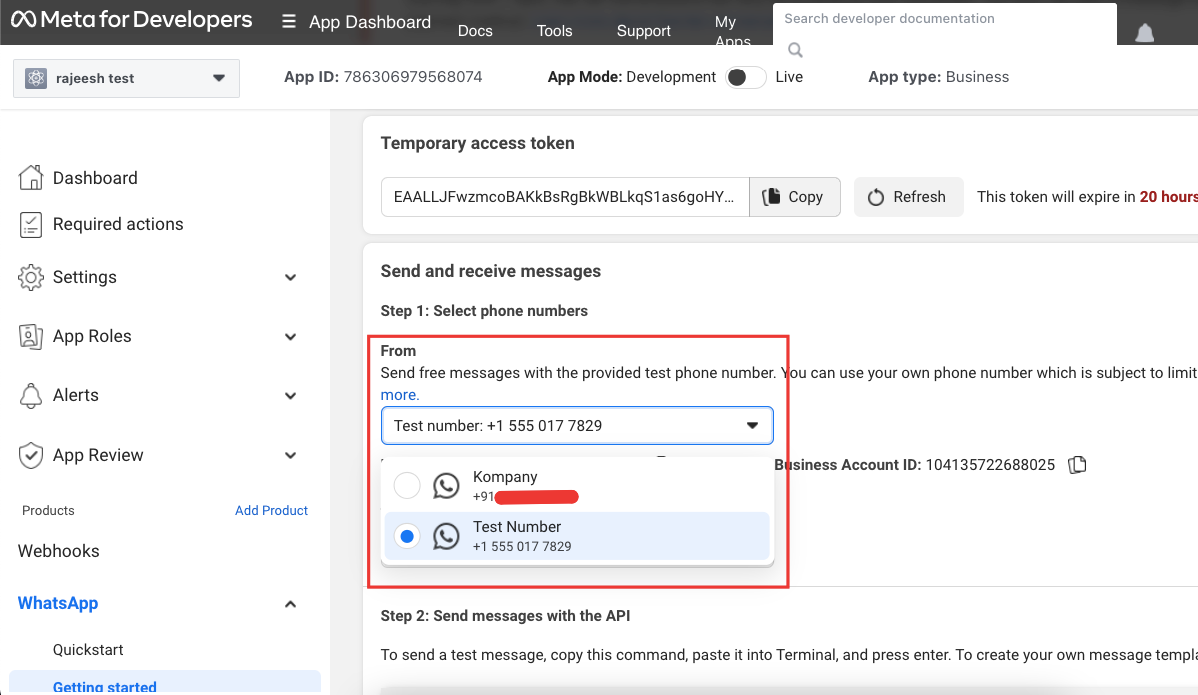
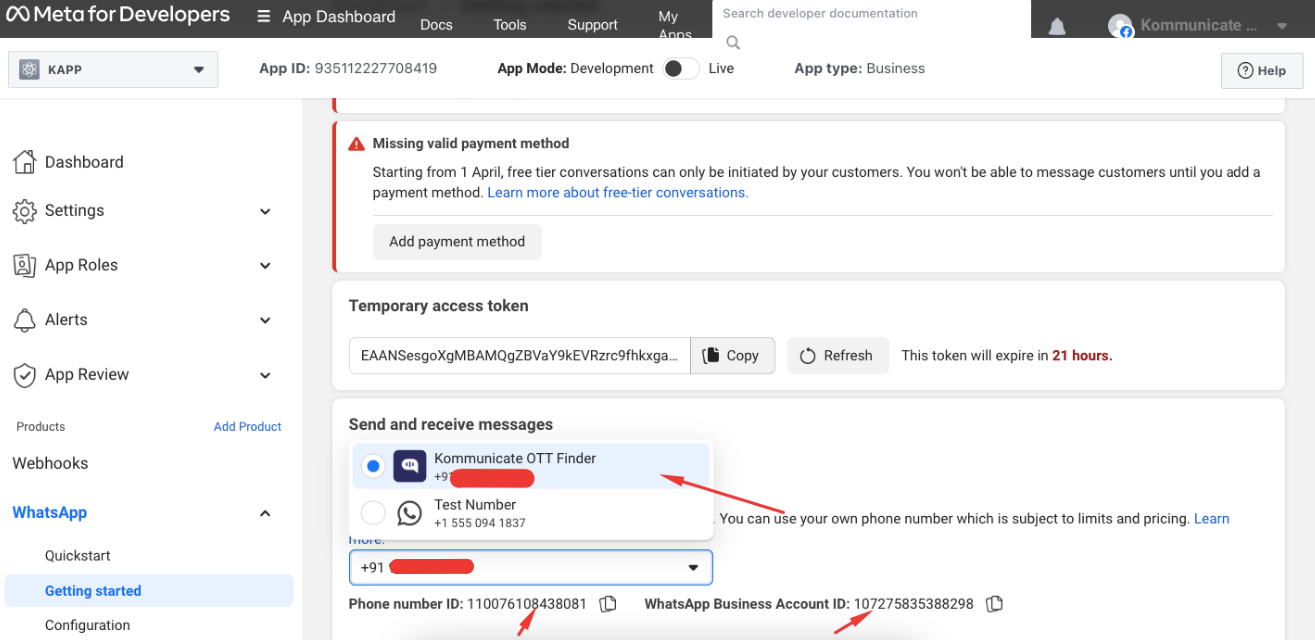
From WhatsApp → Getting started, pick the test number under Step 1: Select phone numbers.
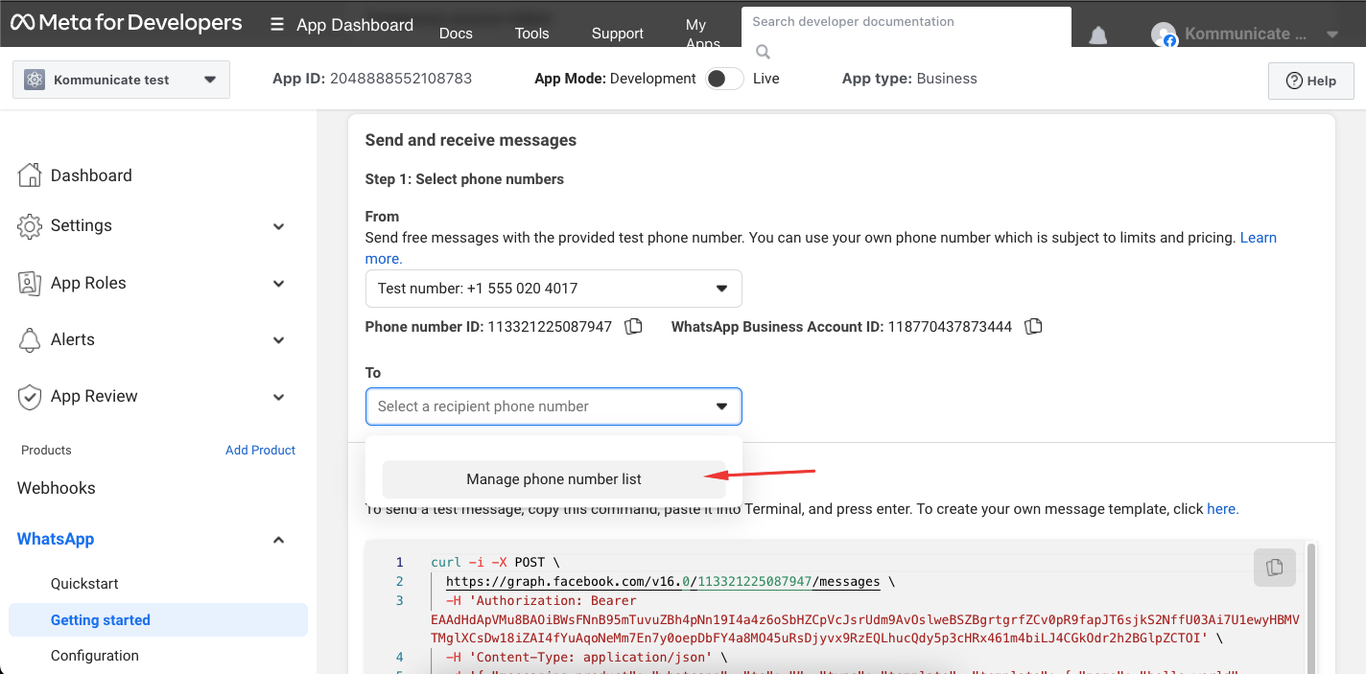
Add your personal WhatsApp number as the recipient (To) and verify it with the OTP. Then in Step 2, click Send message.
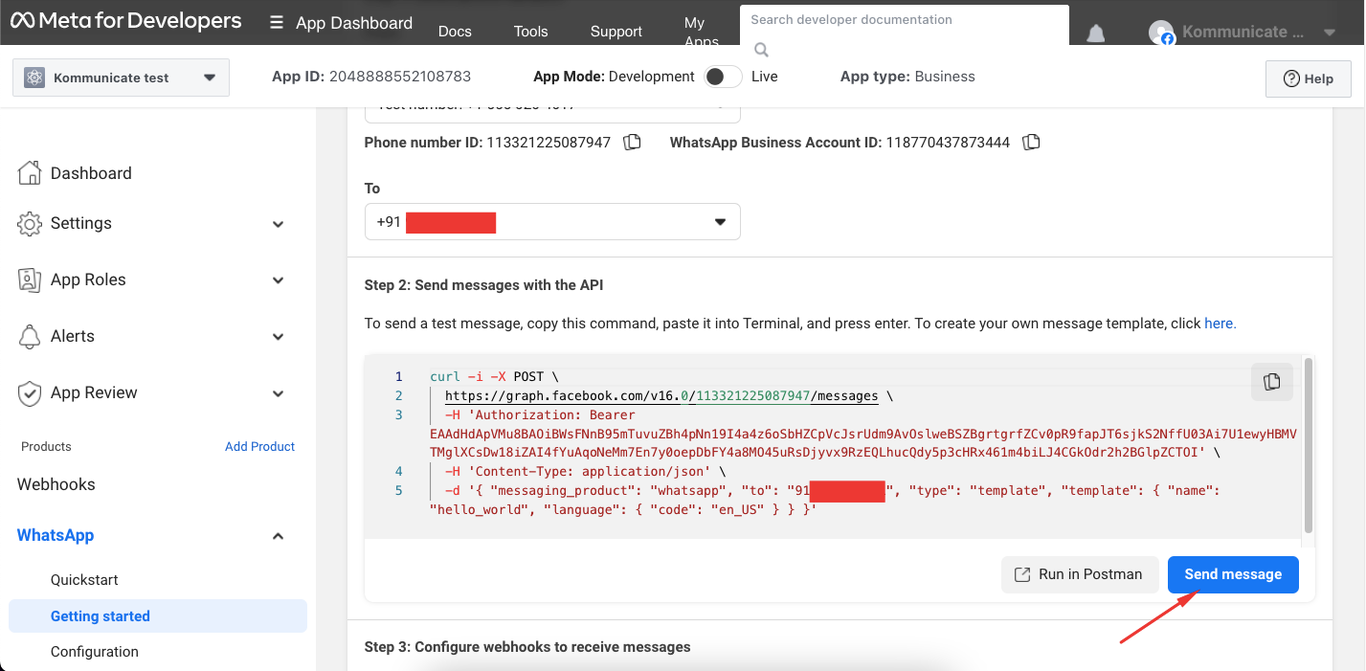
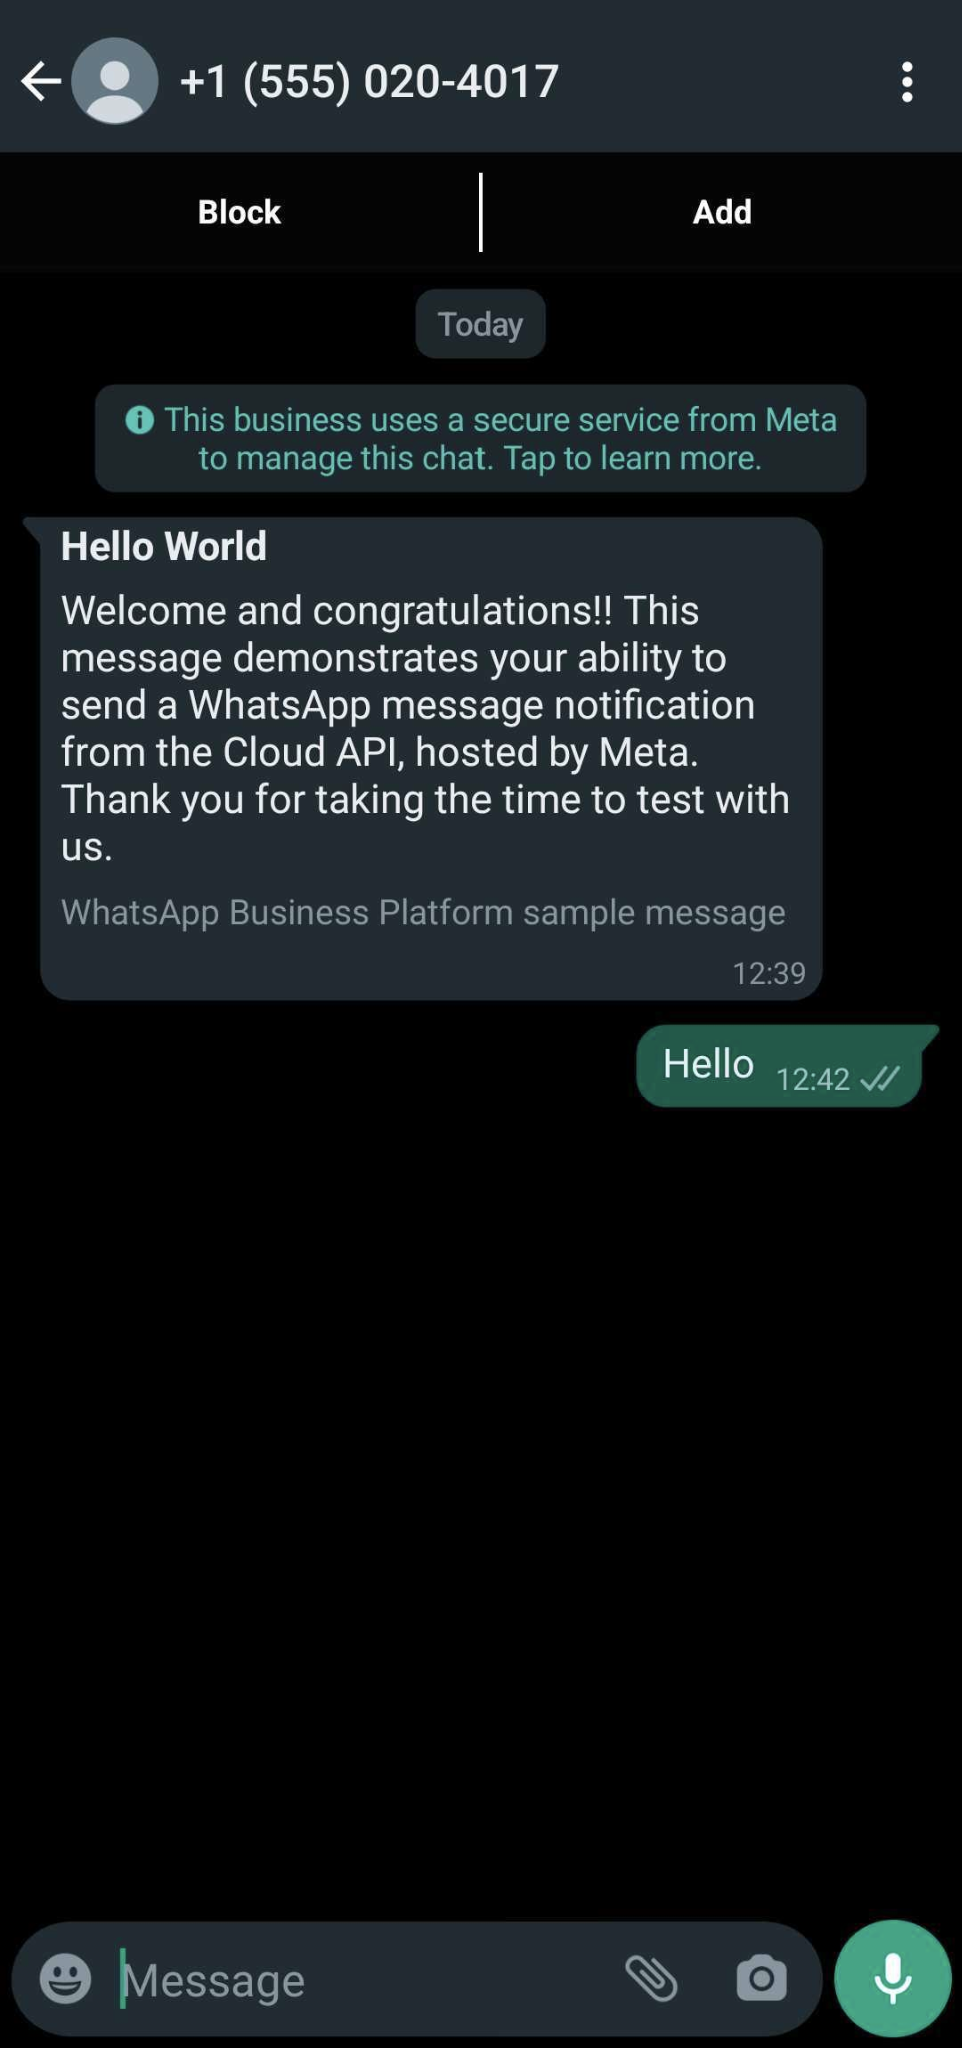
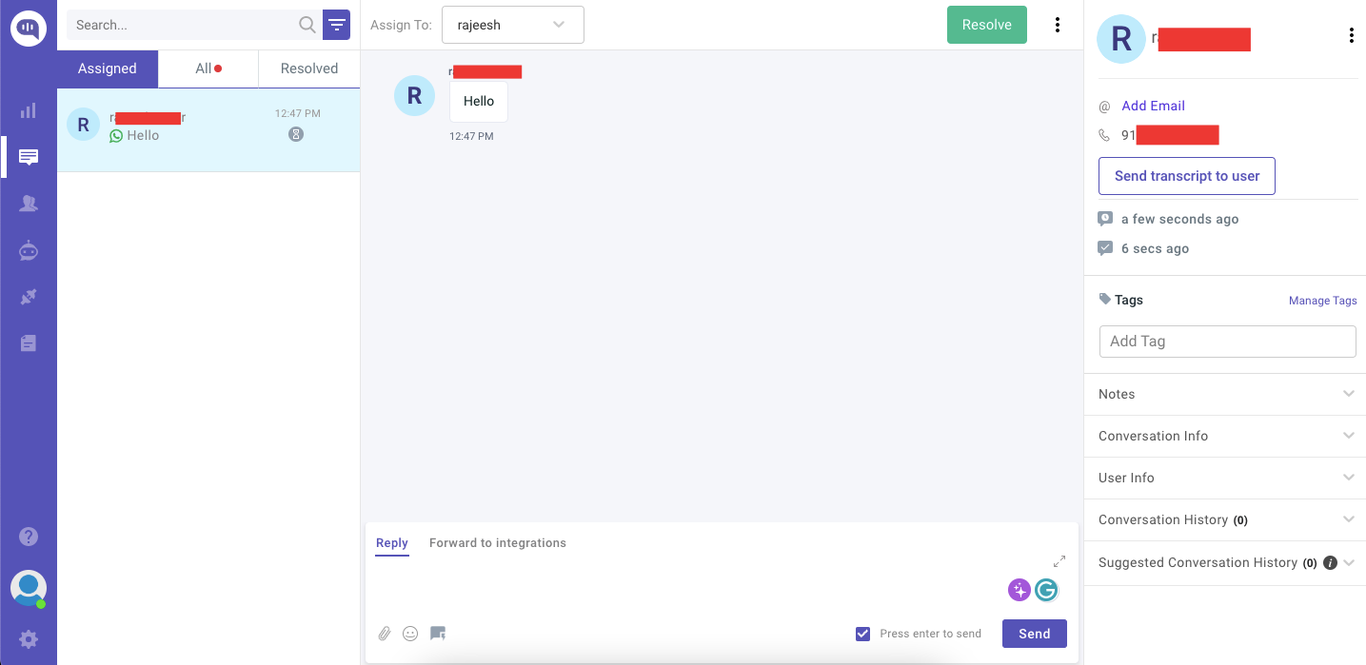
You'll get a "Hello World" template on WhatsApp. Reply with anything — that message will show up live in your Zurvis inbox.
Skip the setup pain. Zurvis connects to the WhatsApp Cloud API in minutes — shared inbox, AI agents, broadcast campaigns and analytics included.
6. Go live with your business number
Sandbox is great for testing, but to message real customers you need to add your own business phone number.
In Zurvis, open WhatsApp Cloud API → Go Live and click + Integrate a new number.
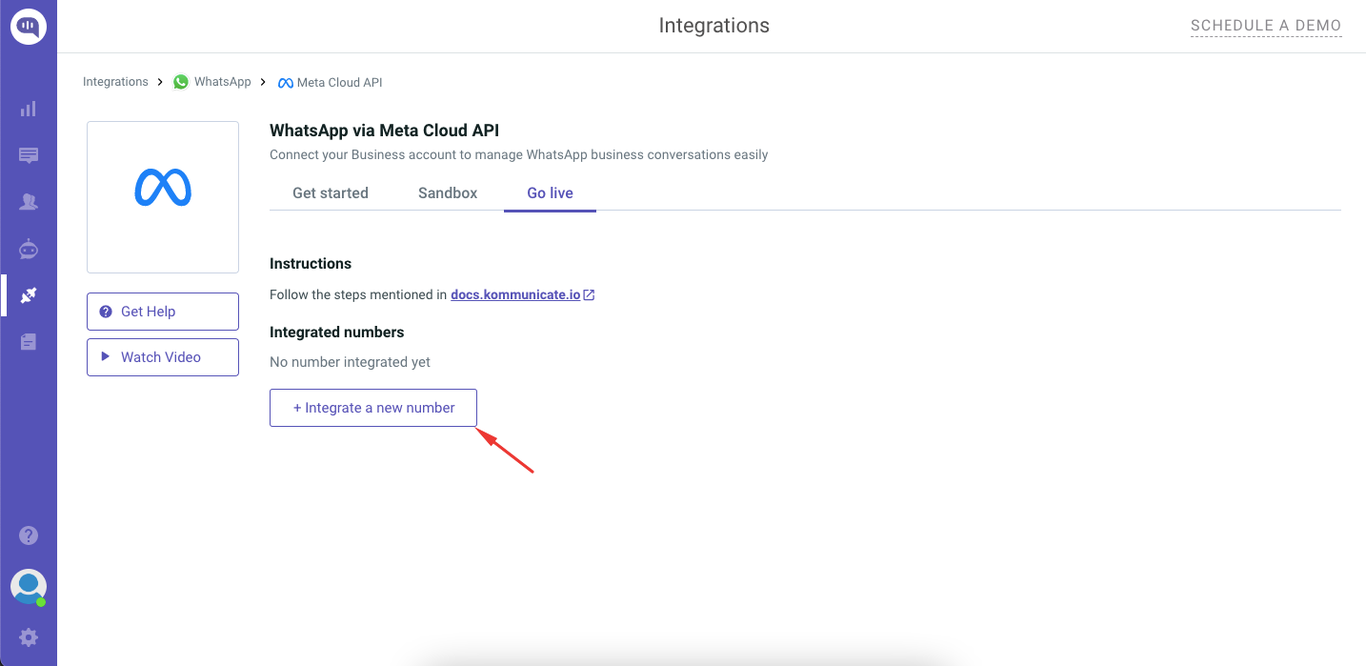
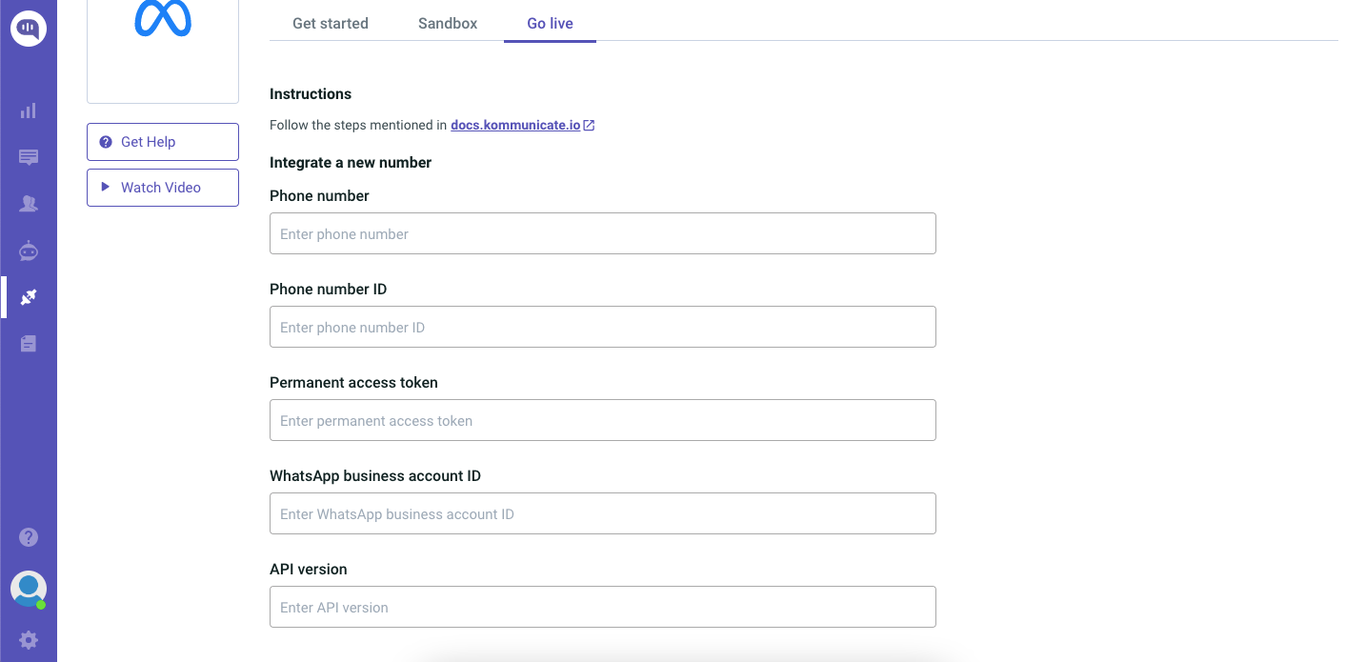
Use a phone number that does not currently have a WhatsApp account attached. Add the country code, then mirror the same number in your Meta app: WhatsApp → Getting started → Add phone number.
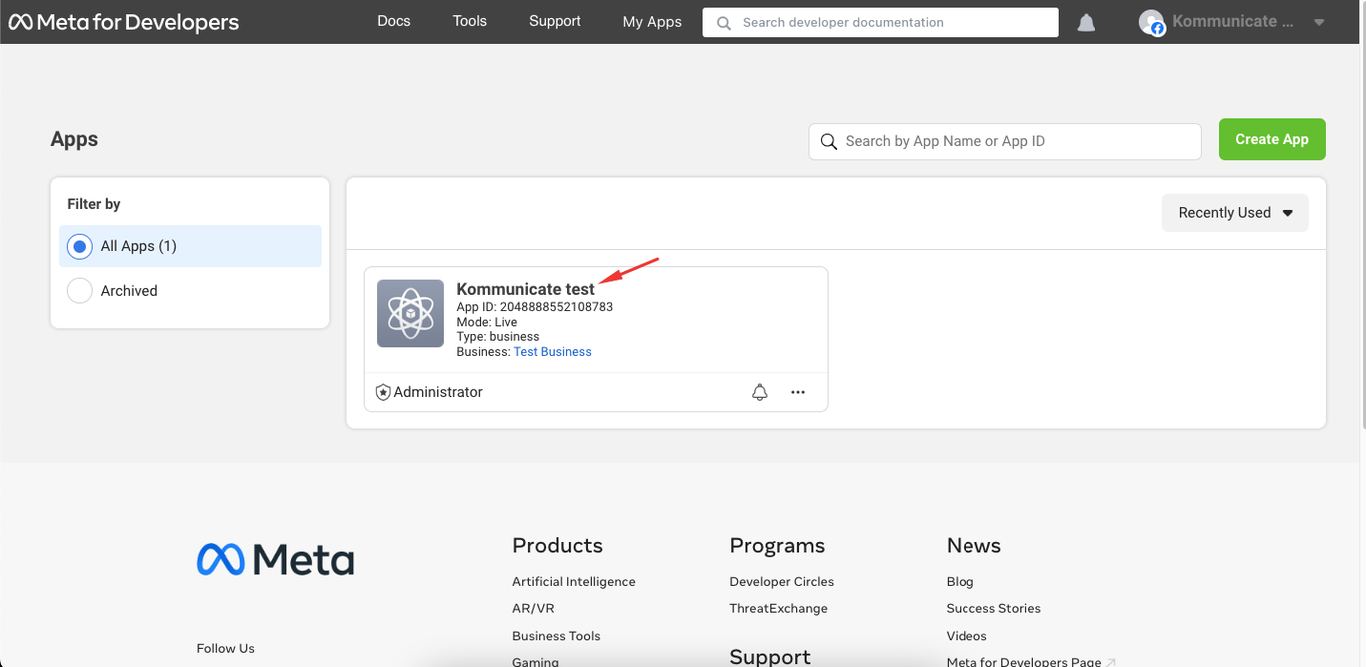
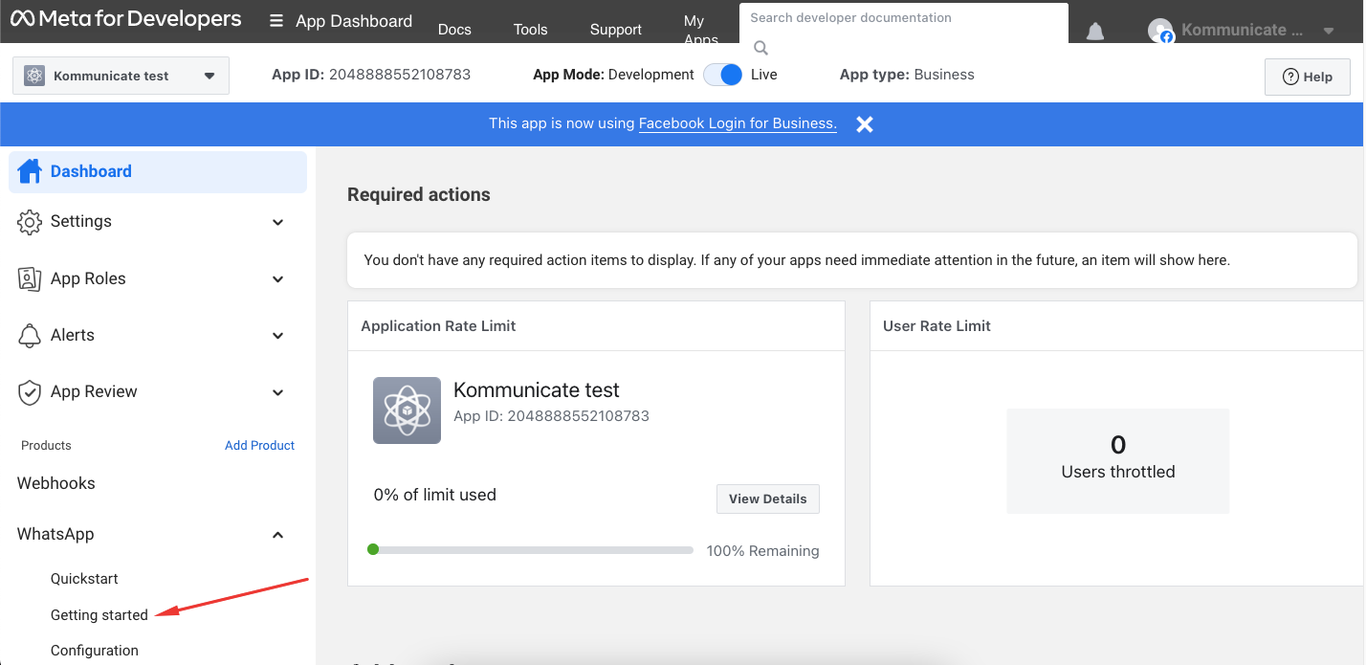
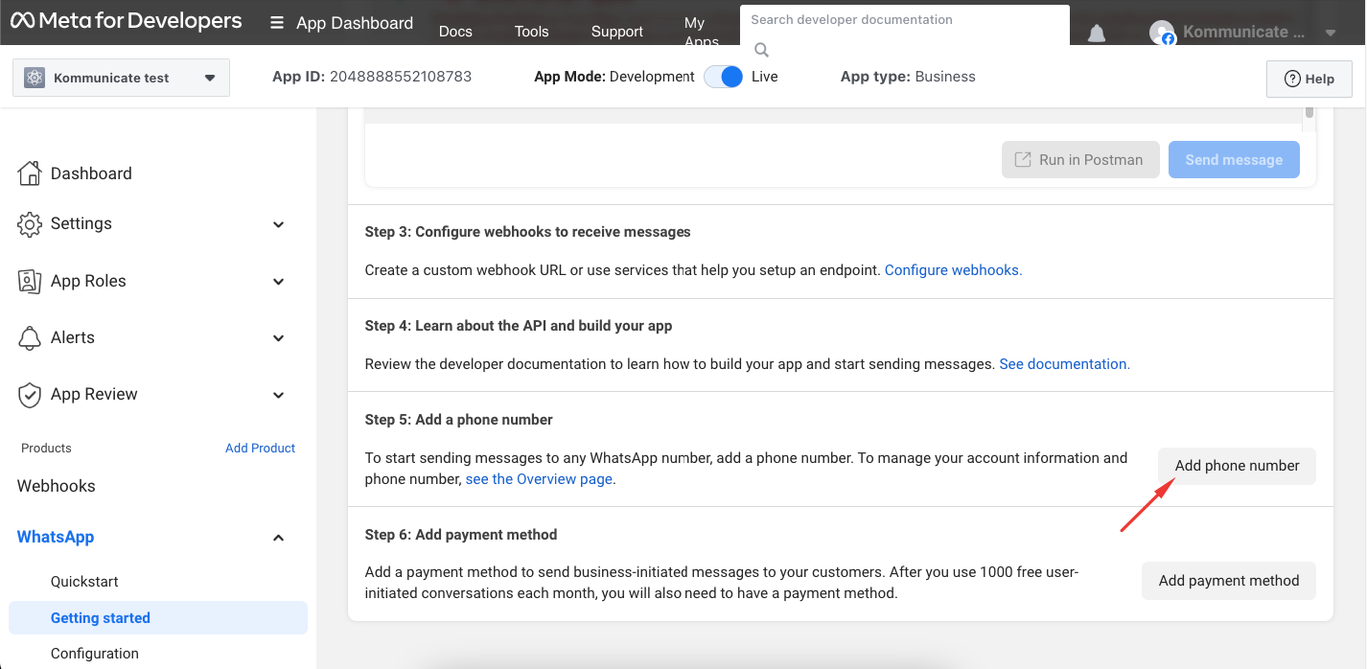
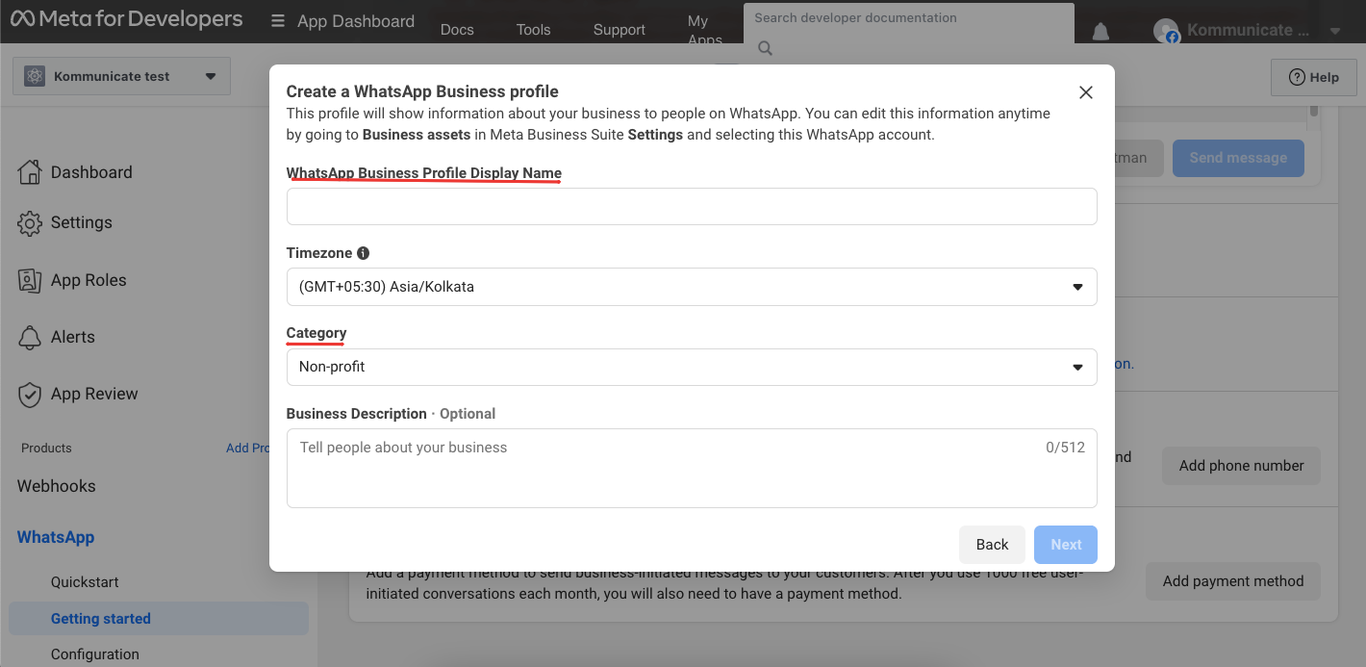
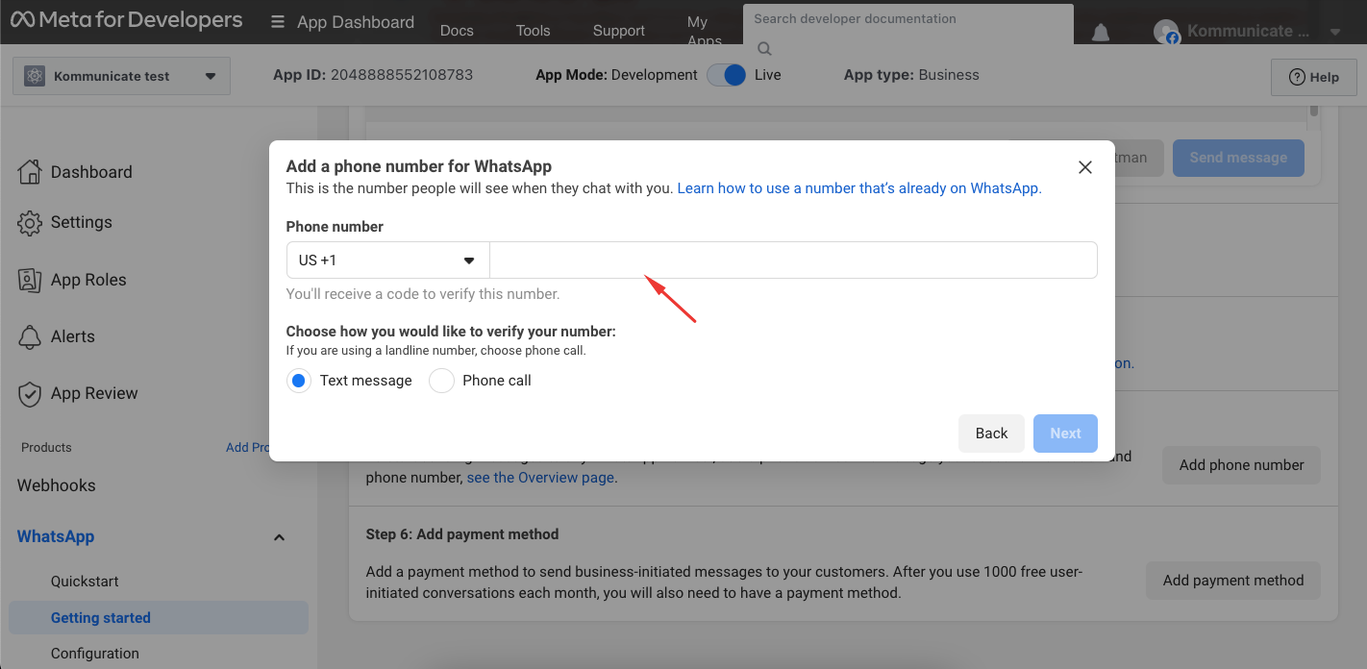
Once added, copy the new Phone number ID and WhatsApp Business Account ID into the Go-live section in Zurvis.
Update the API version too (Meta → Settings → Advanced → Upgrade API version).
Generate a permanent access token
The sandbox token expires every 24h — for production you need a Permanent Access Token. In Meta Business Settings, open the app you just created.
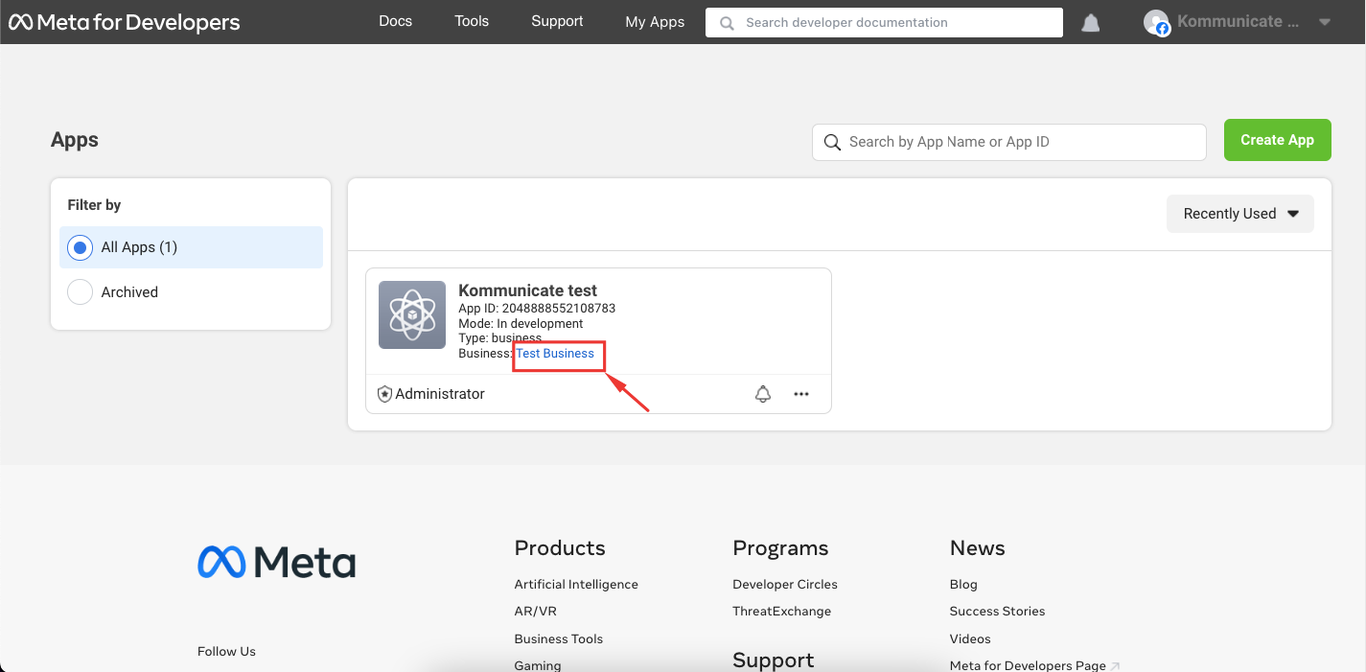
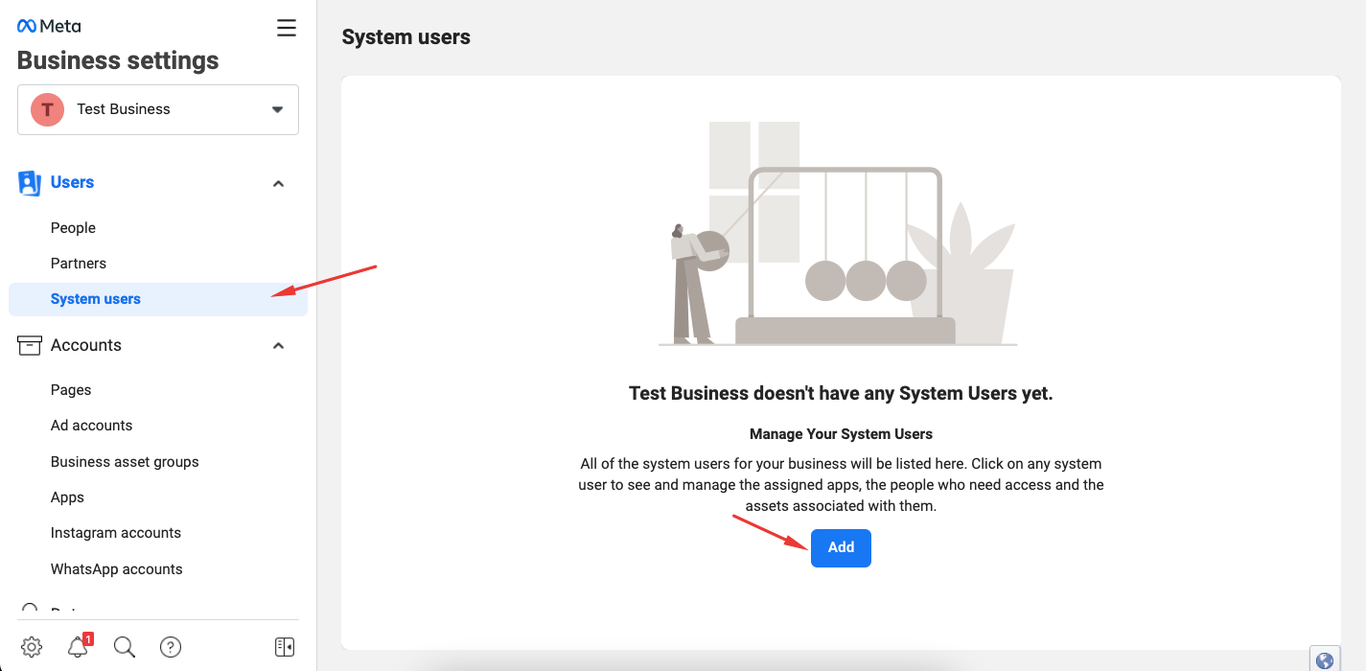
Go to Users → System users, click Add and accept.
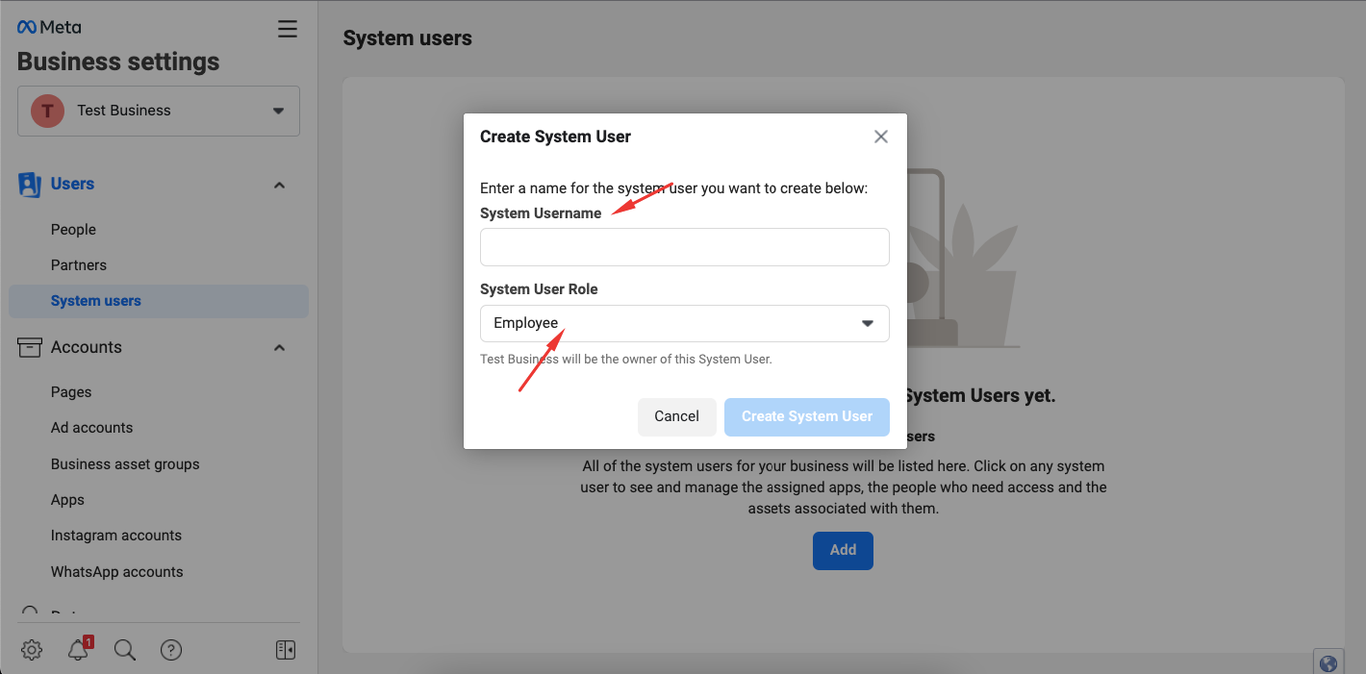
Create a system user with the Admin role.
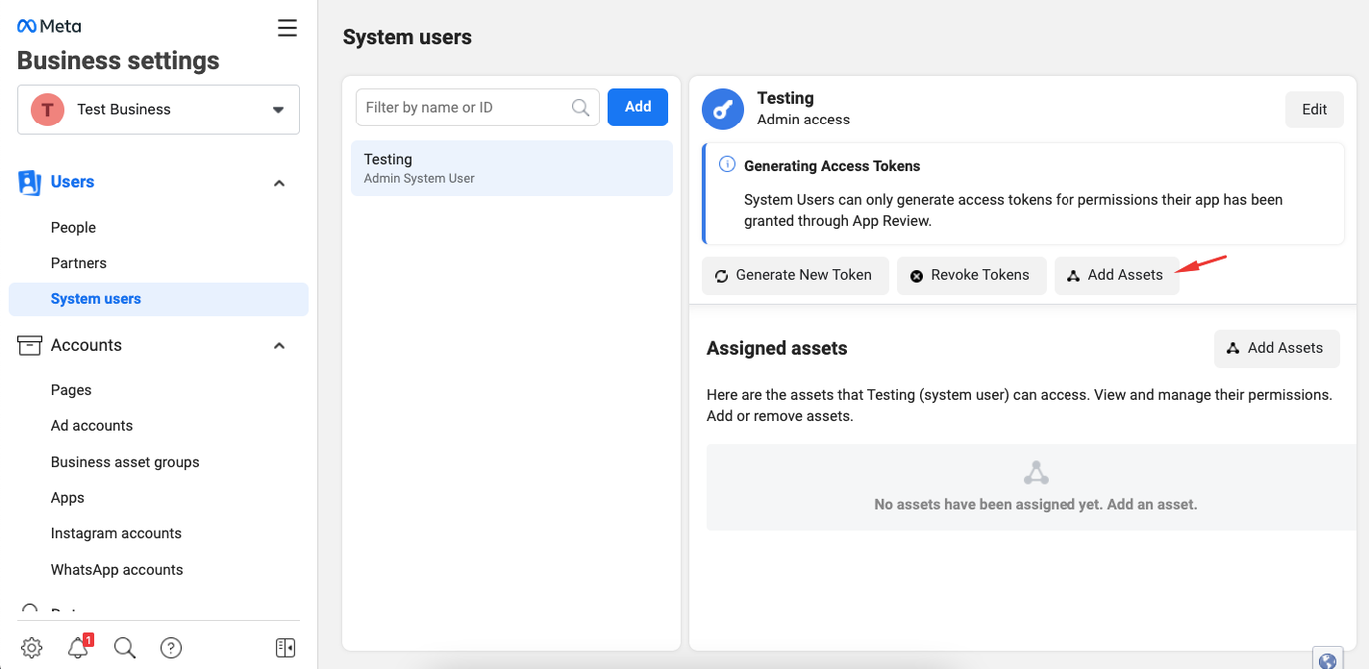
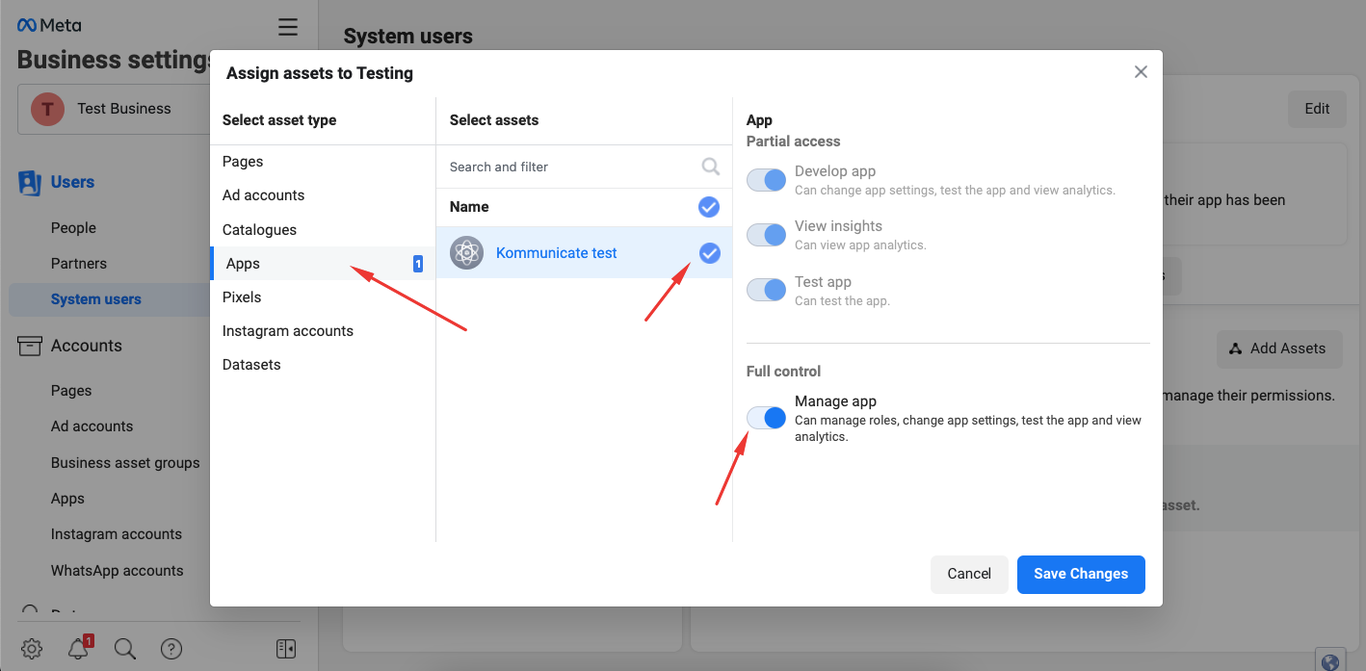
Click Add Assets.
Select Apps, pick your app, enable Full control and save.
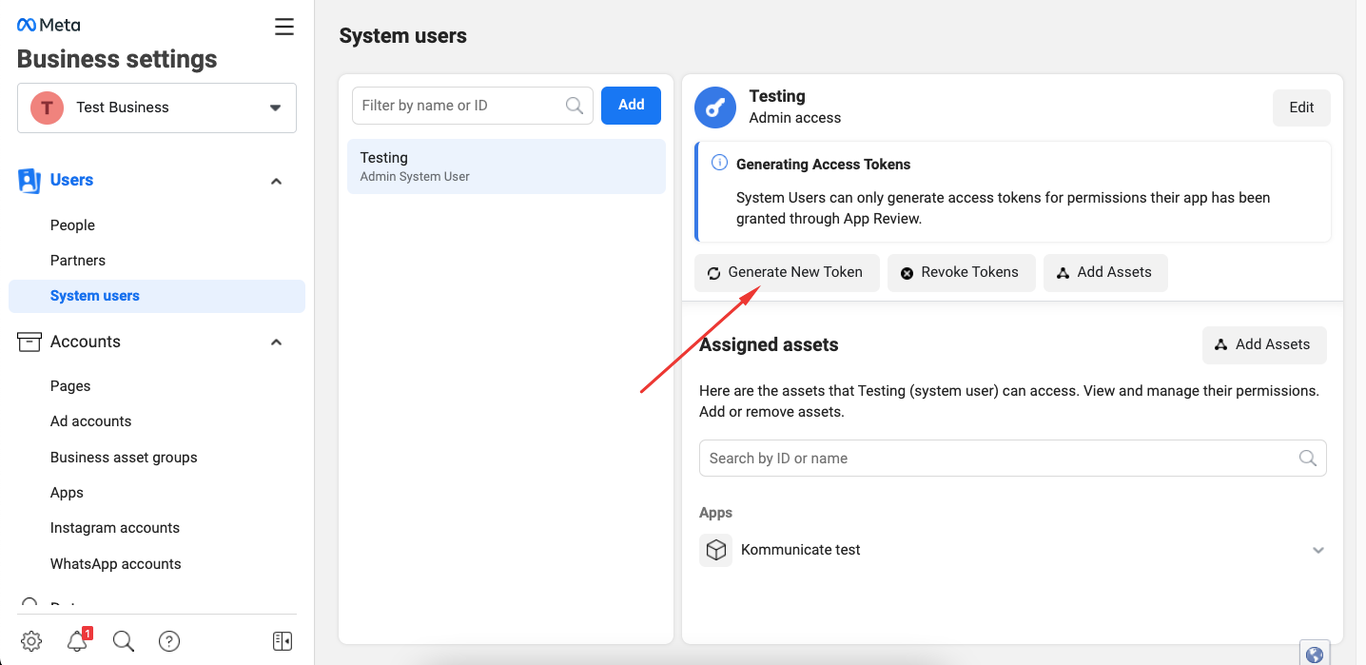
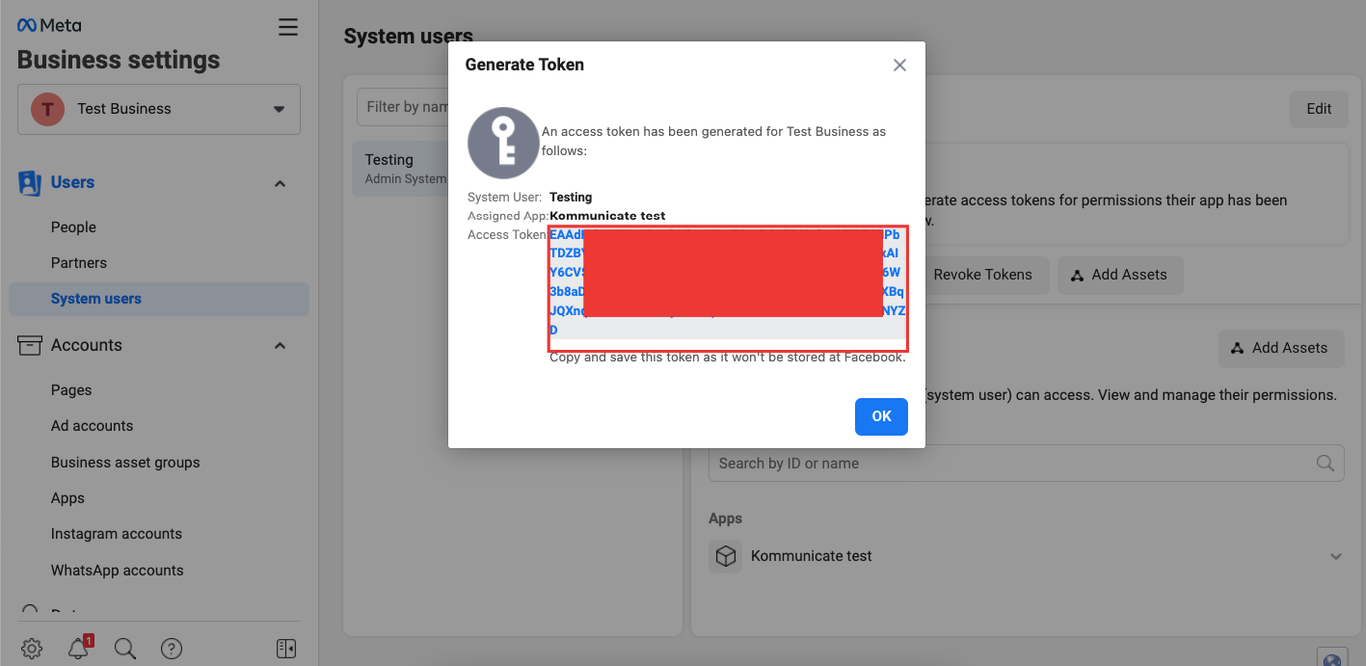
Then click Generate New Token.
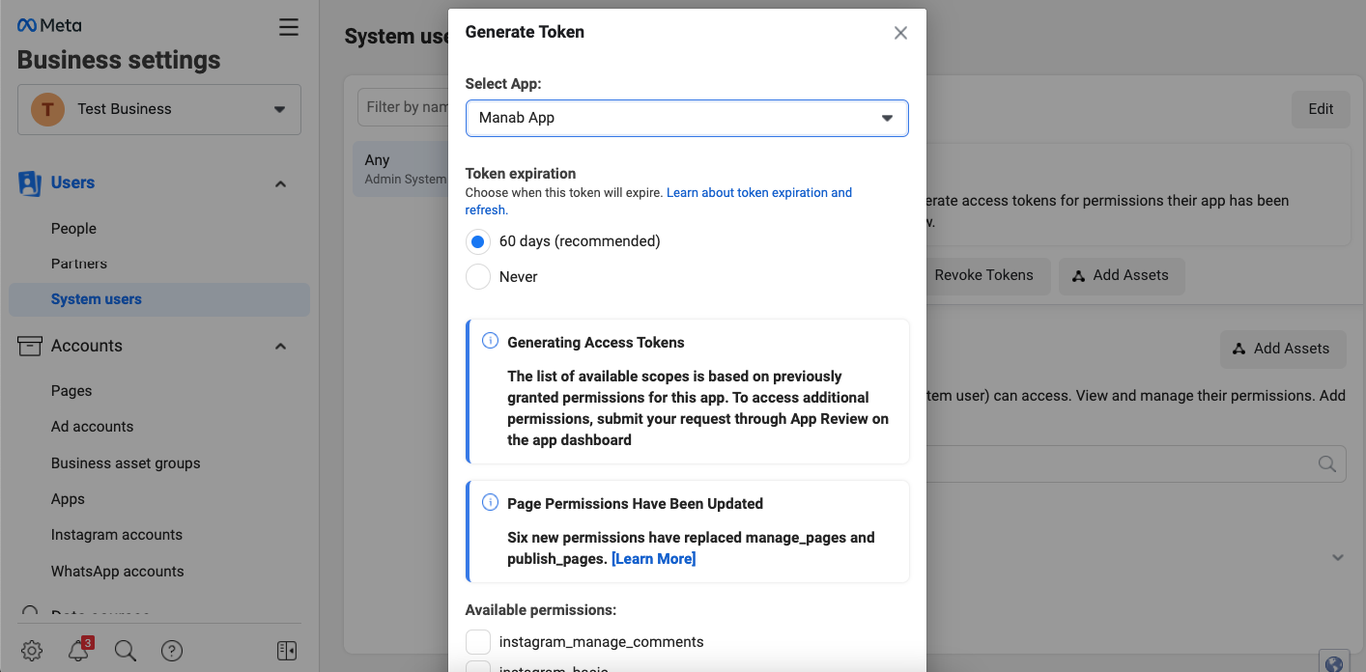
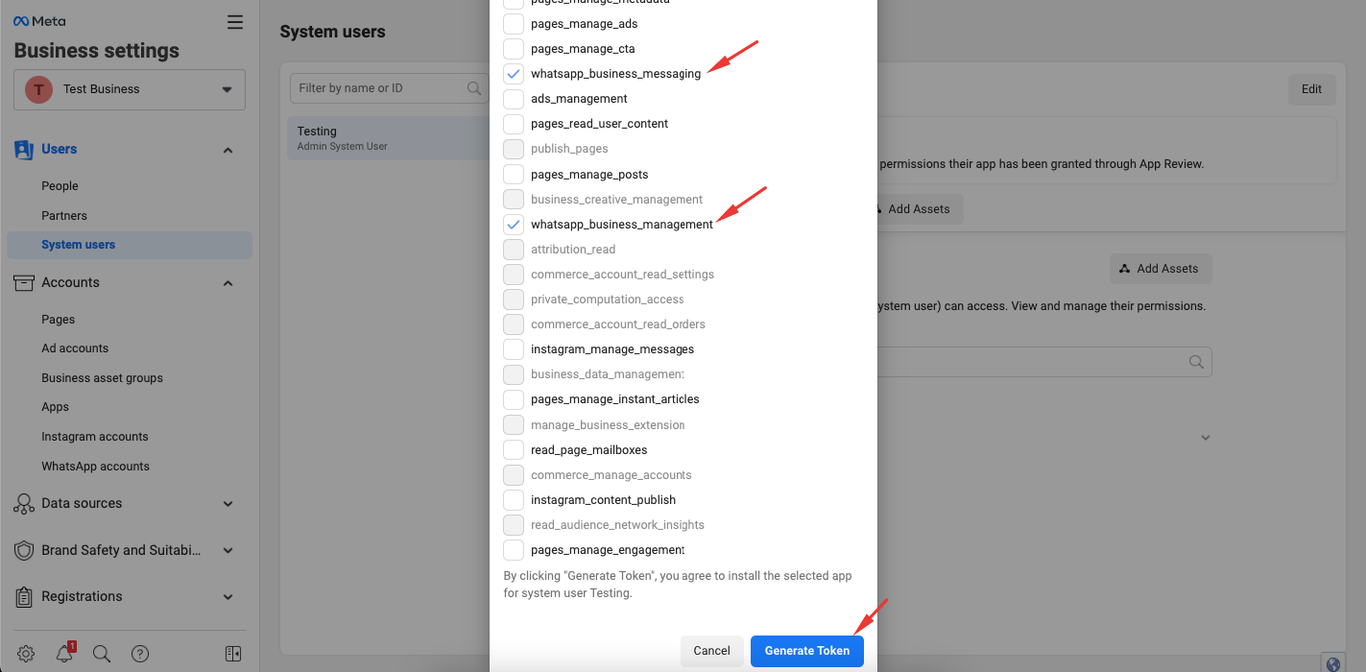
Pick the app, then check whatsapp_business_messaging and whatsapp_business_management. Click Generate Token.
Copy the token and paste it into the Permanent access token field in Zurvis.
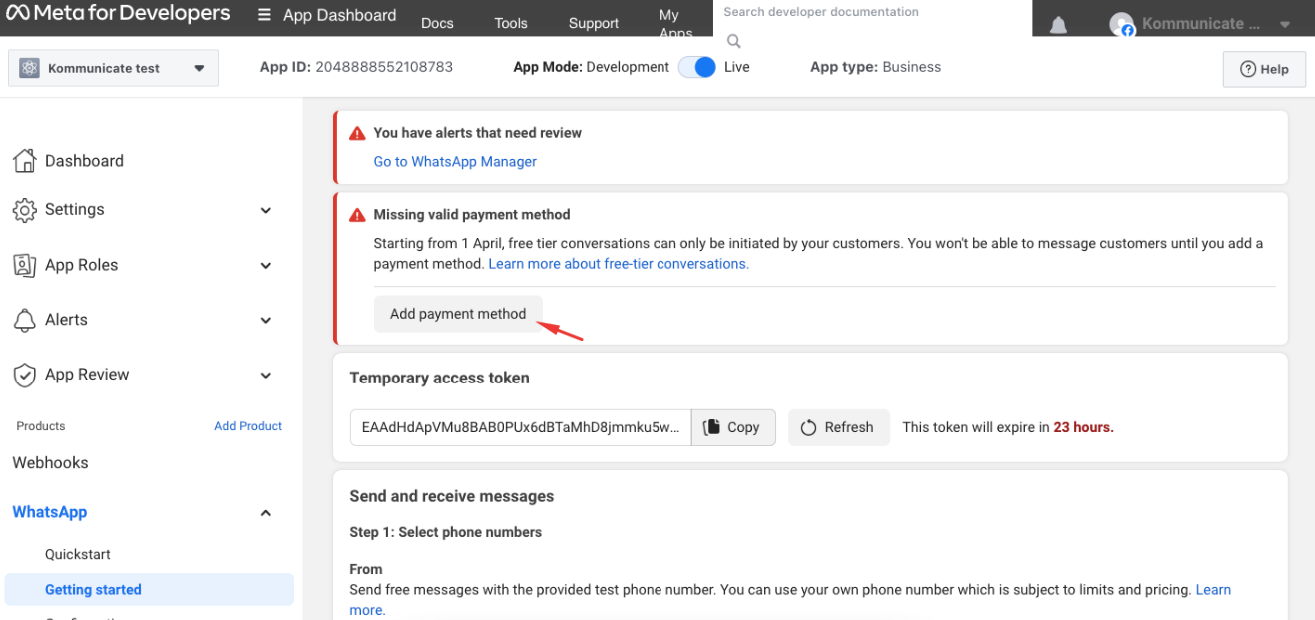
7. Add a payment method
Back in Meta, click Add payment method.
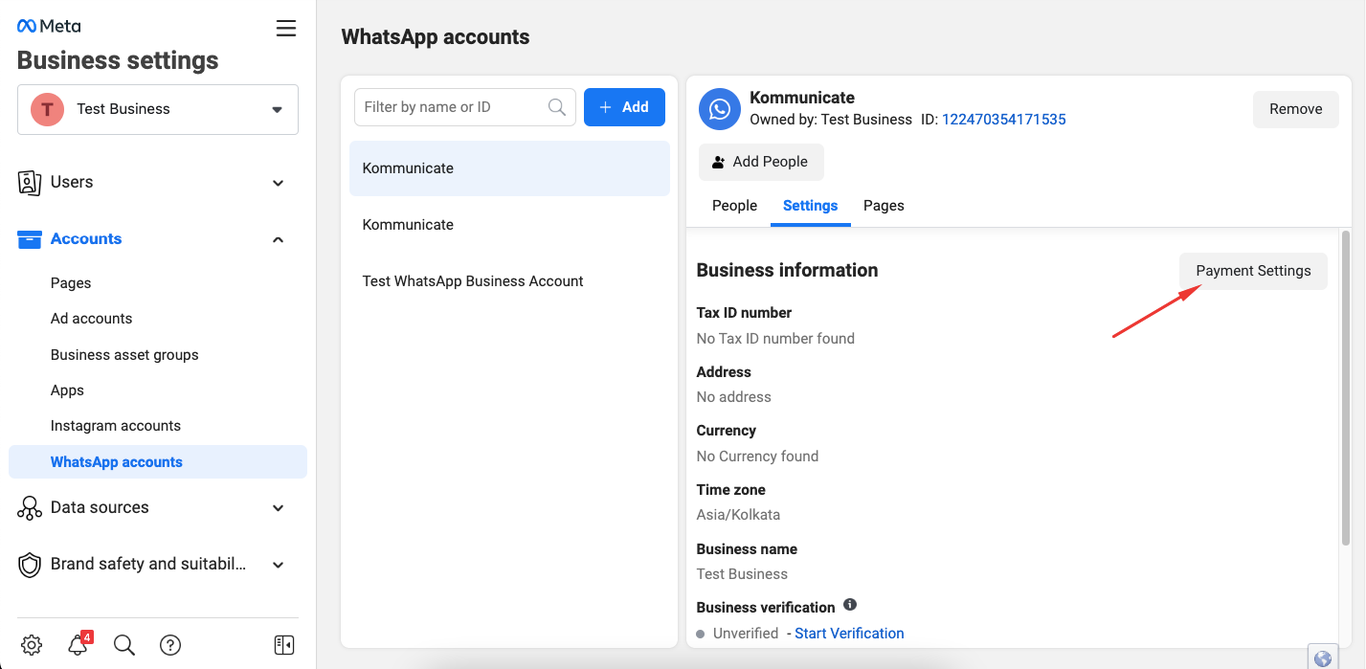
From Meta Business Settings, open Payment Settings.
Click Add payment method on the billing page.
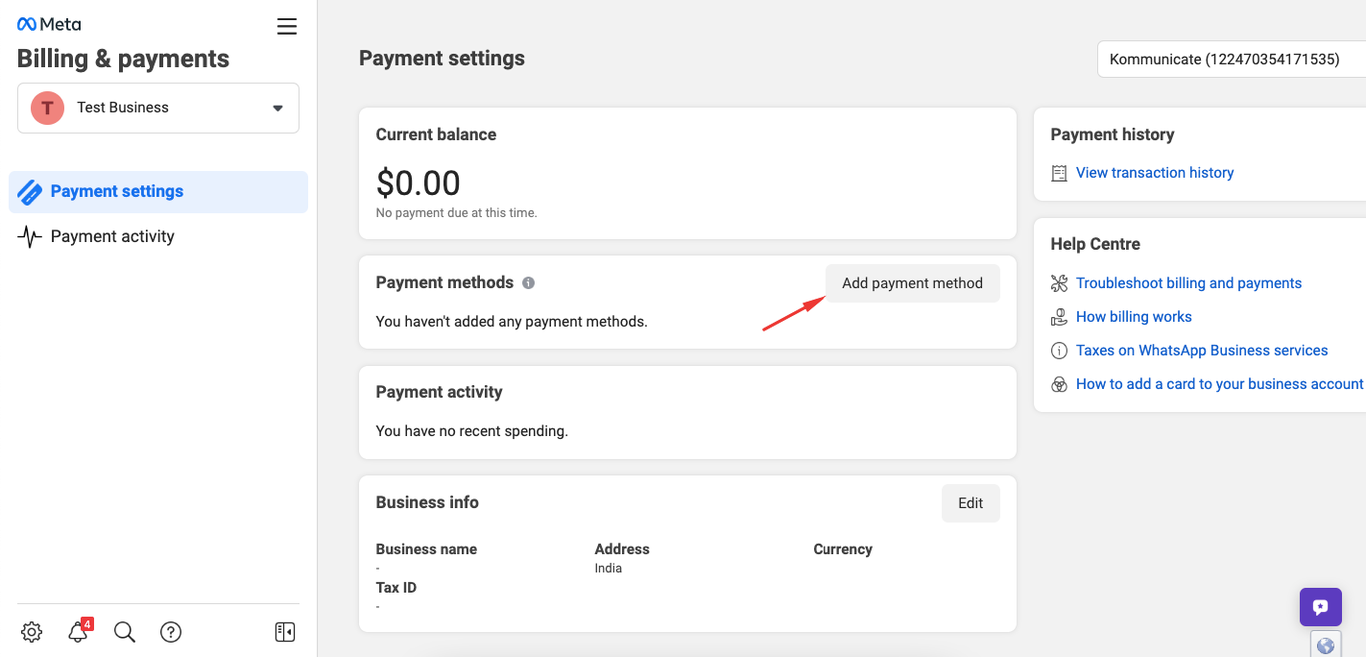
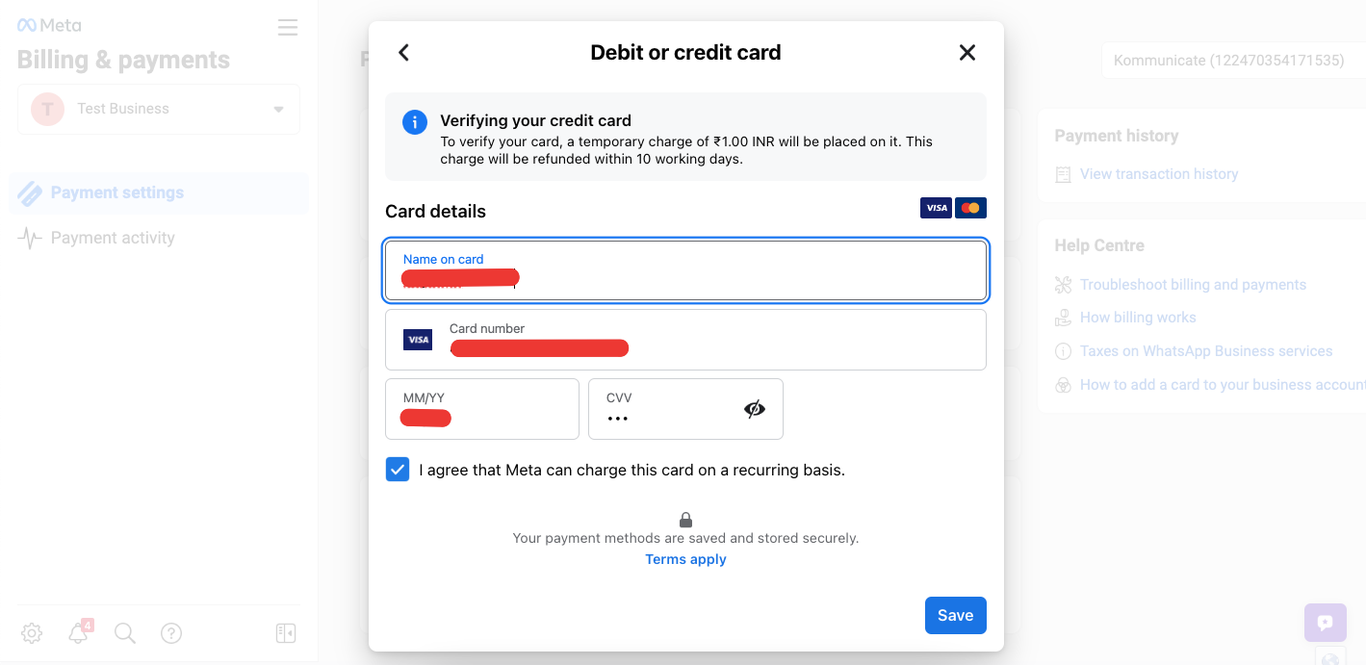
Pick your region, currency and timezone — then enter your card.
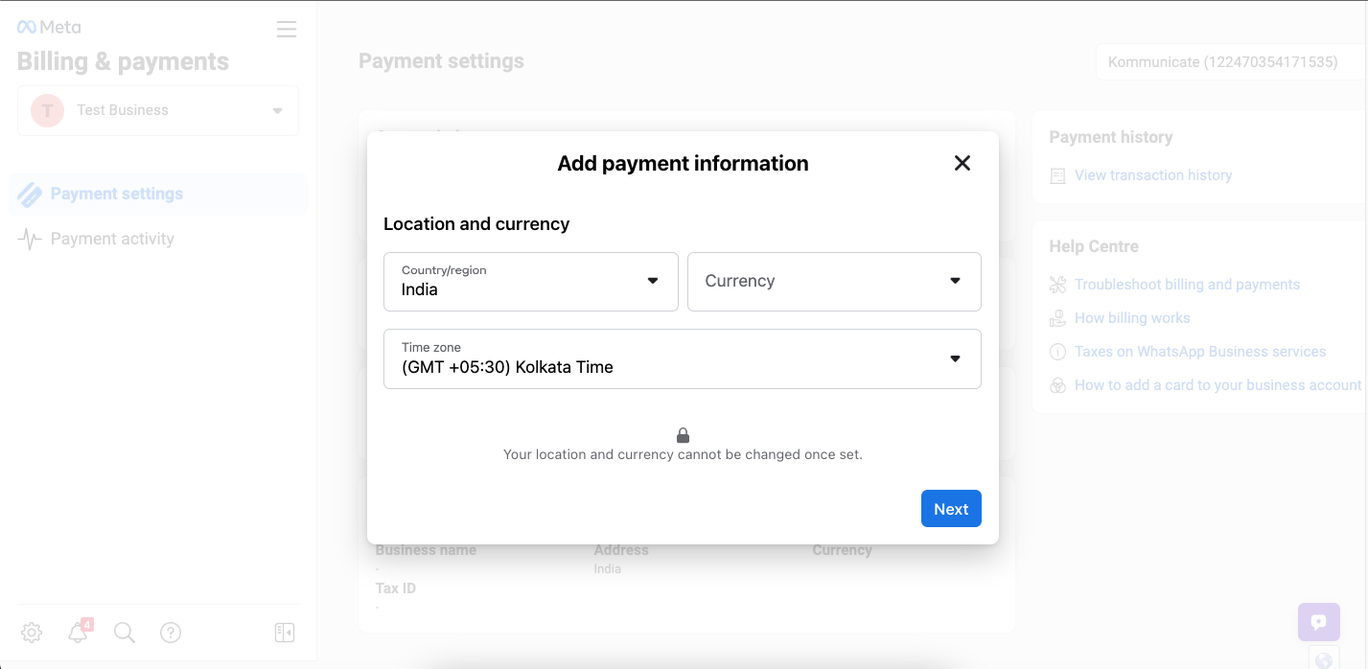
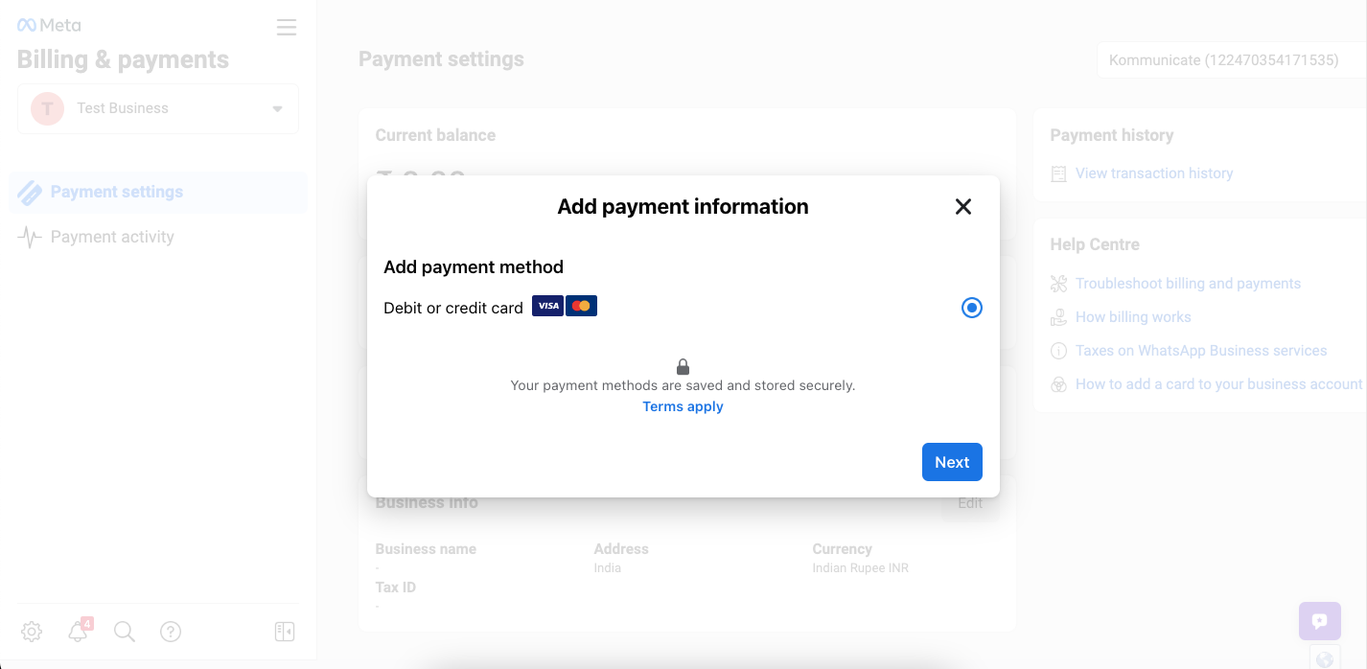
Card verification can take up to 5 minutes. Once verified, fill in your business info and save.
8. Verify your business
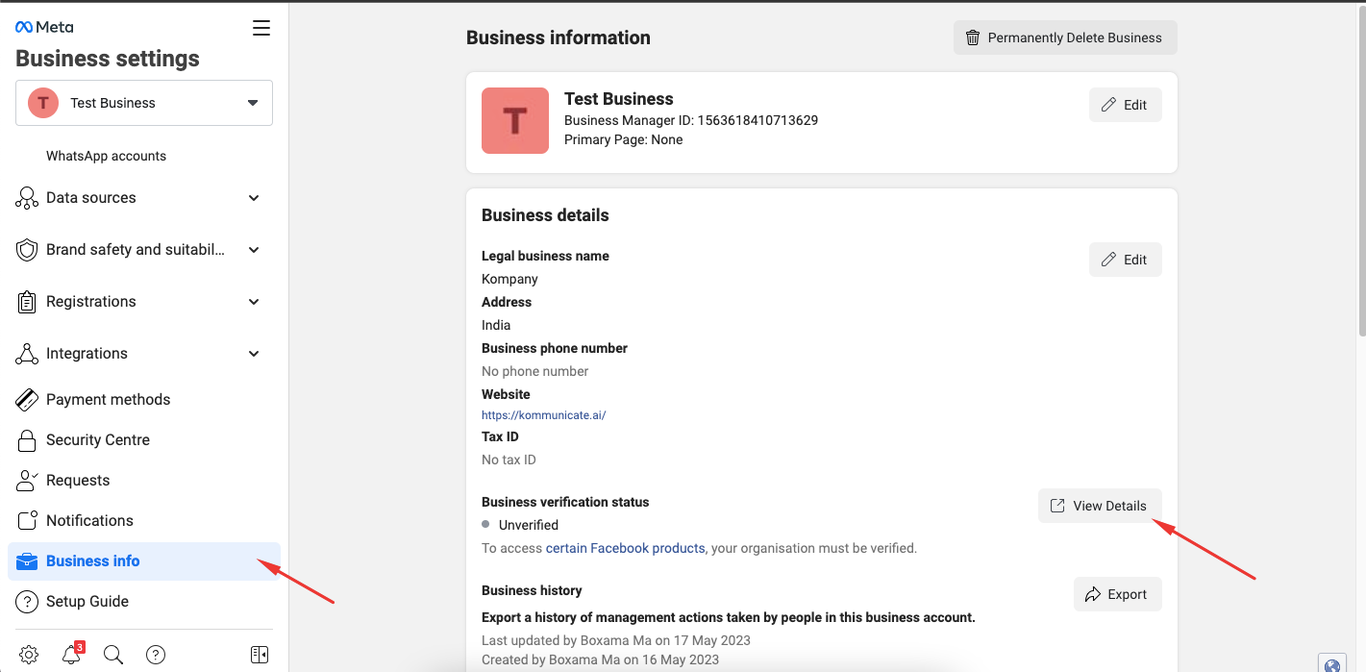
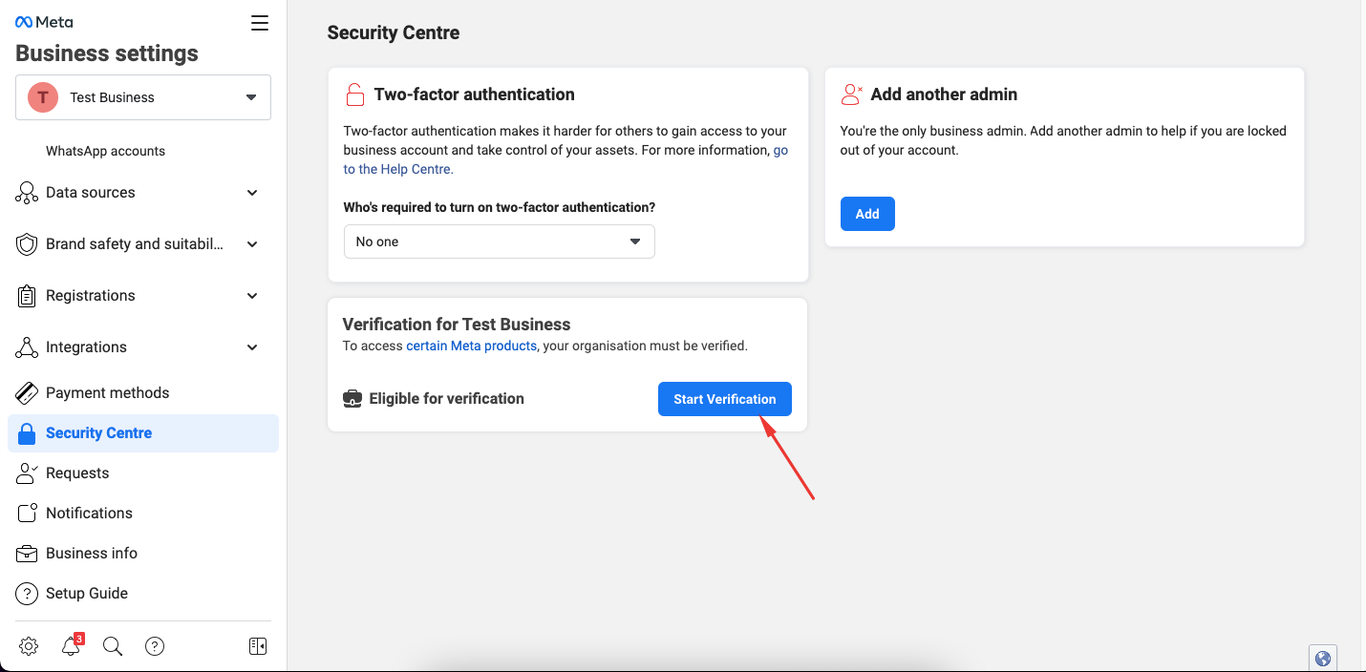
To unlock unlimited messaging and request the green tick, complete Meta business verification.
Open Business info and click View Details under Business verification status.
Click Start Verification.
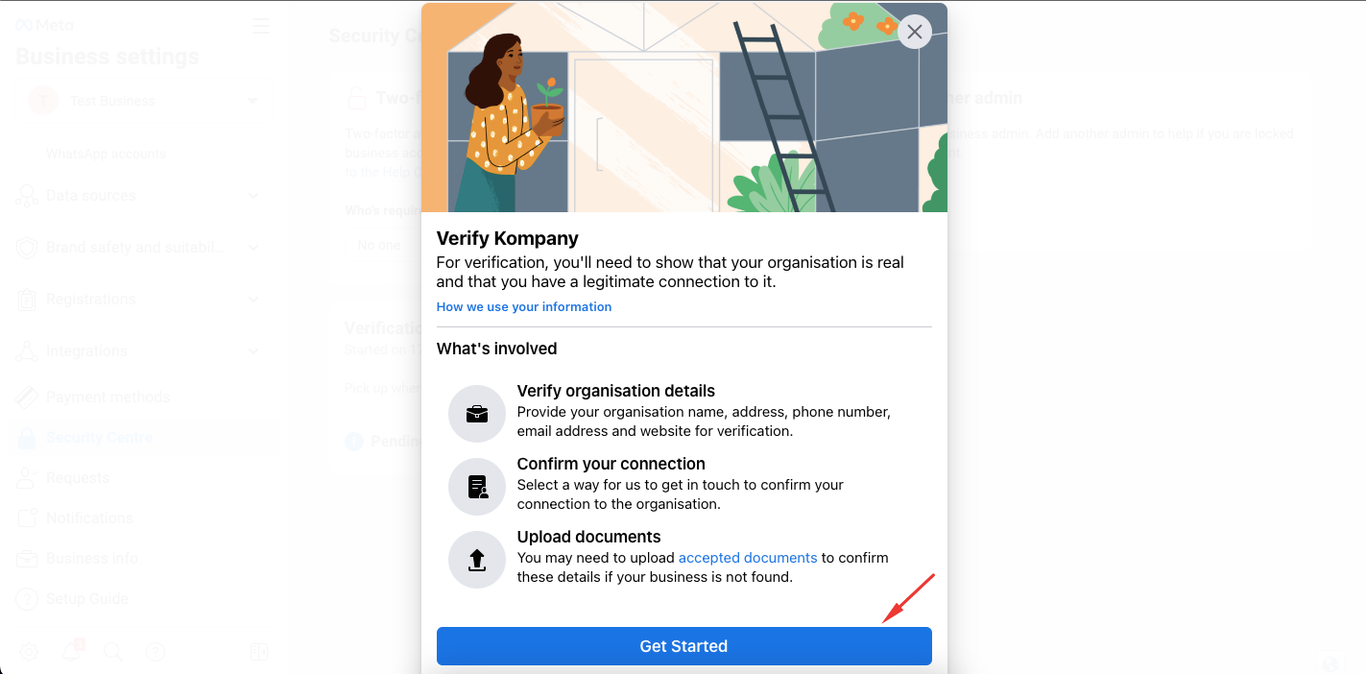
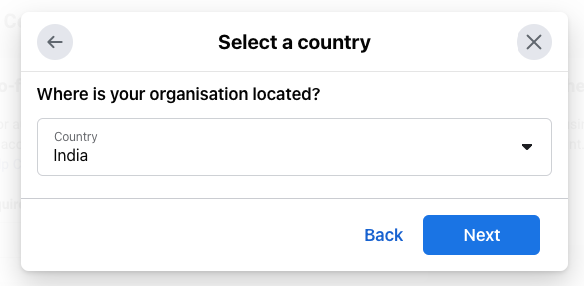
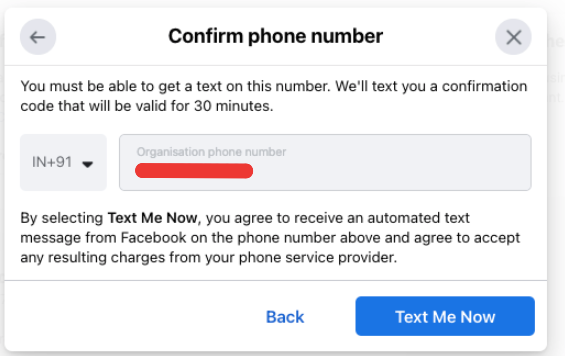
Click Get Started, pick your country and add your organization details.
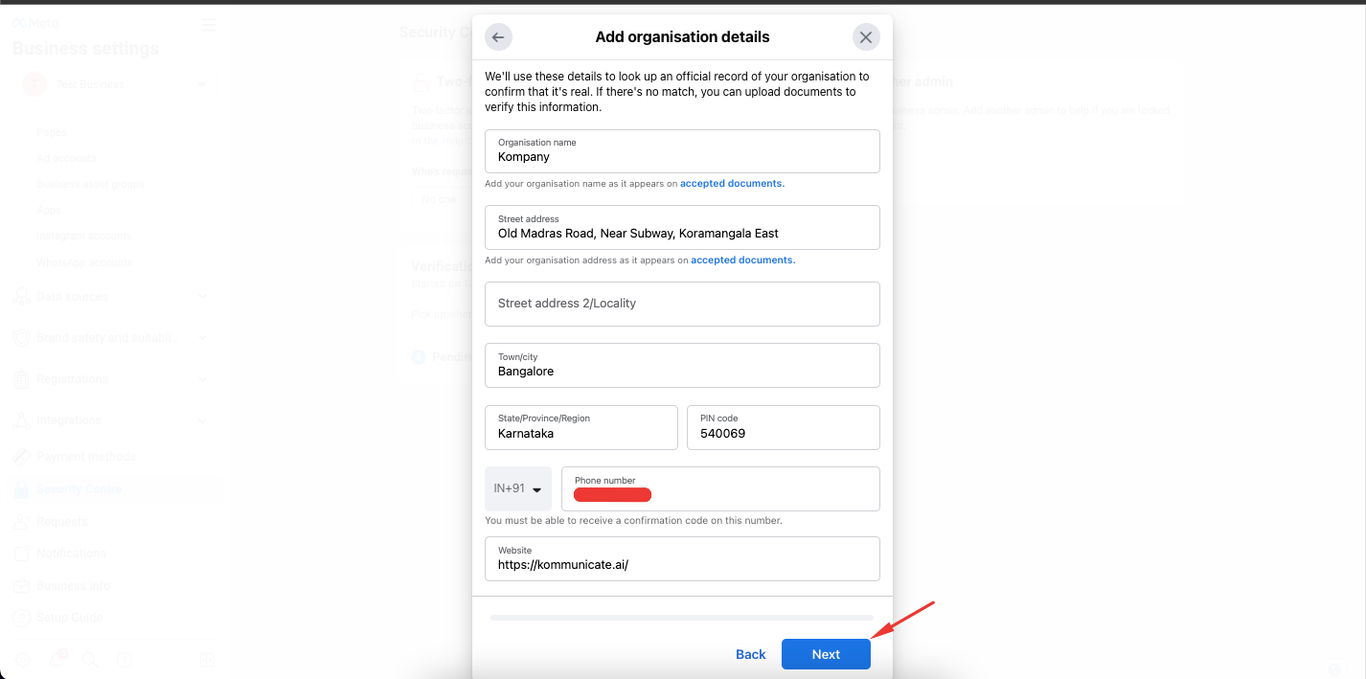
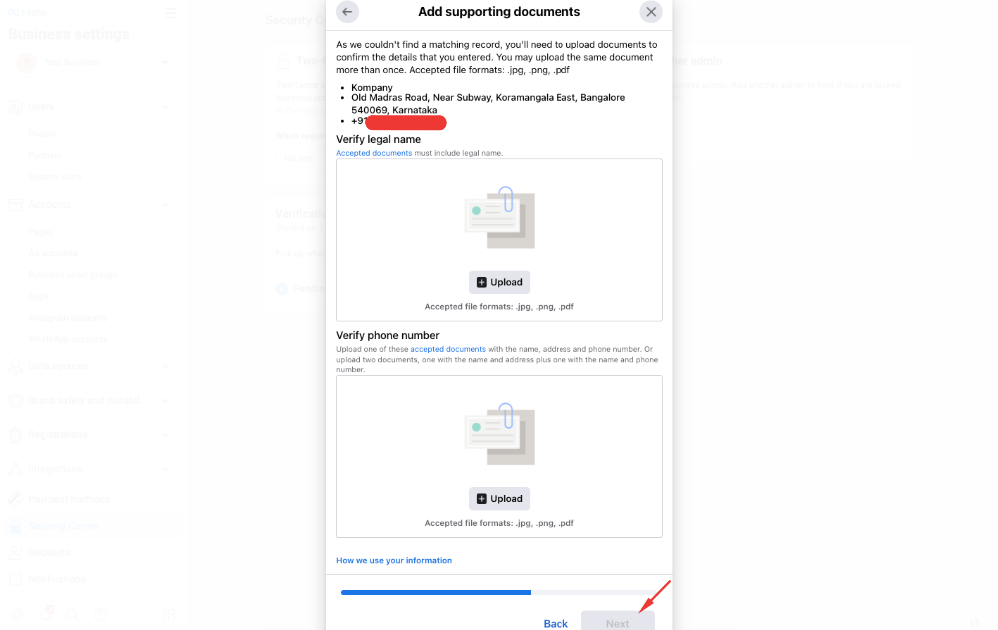
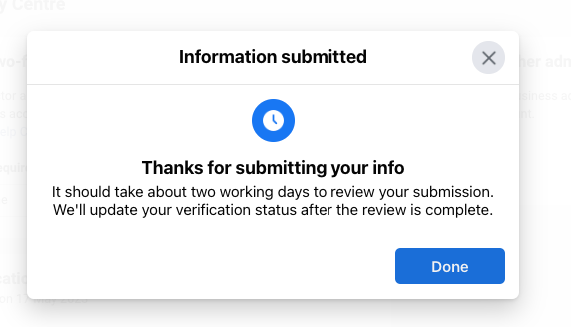
Upload supporting documents (business registration, utility bill, etc.) — most approvals come through within 1–3 business days.

WhatsApp Cloud API pricing
Meta charges per conversation (a 24-hour messaging window), not per message. Pricing varies by country and conversation type:
- Service conversations — first 1,000 per month are free
- Marketing, Utility and Authentication categories are billed per Meta's regional rate card
Want an exact number for your country and volume? Use our WhatsApp Pricing Calculator. Zurvis does not add per-message surcharges — you pay Meta directly and a flat platform subscription to us.
Frequently asked questions
What is the WhatsApp Cloud API?+
The WhatsApp Cloud API is Meta's cloud-hosted version of the WhatsApp Business Platform. It lets businesses send and receive WhatsApp messages programmatically — no on-premise server required.
How much does the WhatsApp Cloud API cost?+
Meta gives you 1,000 free service conversations per month. Beyond that, charges follow Meta's per-conversation rate card (varies by country and conversation type). Zurvis adds no per-message fees on top.
How long does setup take?+
Connecting a sandbox number through Zurvis takes about 10 minutes. Going live with a real business number takes 1–3 business days, mostly waiting on Meta business verification.
Do I need a developer to use the WhatsApp Cloud API?+
No. With Zurvis you paste 4 values from Meta into the dashboard — no code required. Developers can still use our REST API and webhooks for custom flows.
Can I switch from another BSP to Zurvis?+
Yes. The WhatsApp Cloud API lets you migrate your number between BSPs without losing your green tick or message templates. Our team helps with the migration end to end.
Skip the setup pain. Zurvis connects to the WhatsApp Cloud API in minutes — shared inbox, AI agents, broadcast campaigns and analytics included.